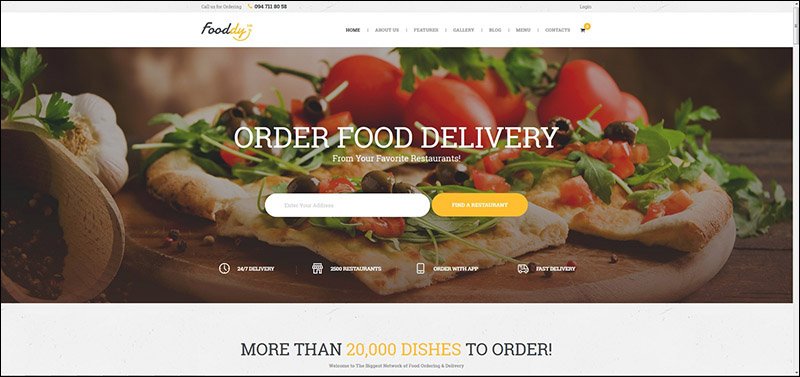
Depending on the features you are looking to add in your on-demand food delivery mobile app and the resources that it would require to get your app transformed from its idea stage to the launch phase
With This App You Can Sell Not Only Foods But Also All Kind Of Woocommerce Products.
[tie_full_img]
 [/tie_full_img]
[padding left=”5%” right=”5%”]
We already Created a tutorial on HOW TO MAKE MULTIVENDOR WOOCOMMERCE FOOD ORDERING WEBSITE.
Ionic offers a number of conveniences for mobile application development, covering over 3.2 percent of the whole mobile app market
In this tutorial we are making a multivendor food ordering Android App like zomato,swiggy, with WordPress WooCommerce and Ionic Framework. You can make this App without any technical or coding knowledge. Best part of this website is its completely built With Woocommerce and its gps enabled.so a customer can places an order from there Location to nearest restaurants and also search based on location. A fixed commission will be get to the site owners and Remaining amount will be added to the restaurant owners.in this video session we are discussing about Setting Up the ionic Environment and making Android App
Ionic Framework
Ionic Framework is an open source UI toolkit for building performant, high-quality mobile and desktop apps using web technologies — HTML, CSS, and JavaScript — with integrations for popular frameworks like Angular, React, and Vue.
Ionic apps are created and developed primarily through the Ionic command-line utility. The Ionic CLI is the preferred method of installation, as it offers a wide range of dev tools and help options along the way. It is also the main tool through which to run the app and connect it to other services, such as Ionic Appflow.
[/padding]
Before Installing ionic Set up this things on your pc!
- Installation of the JDK
- Install Visual Studio Code
- Install Android Studio-(optional)
- Install GIT
- Install Gradle-(6.4.1 Recommended)
- Install ionic cordova
I’m up to something. They don’t want us to win. Mogul talk. Look at the sunset, life is amazing, life is beautiful, life is what you make it.
[padding left=”5%” right=”5%”]
Installation of the JDK
JDK Installation Instructions for Windows
You run a self-installing executable file to unpack and install the JDK on Windows computers.
Install JDK on Windows computers by performing the actions described in the following topics:
Downloading the JDK Installer
Access Java SE Downloads page and click Accept License Agreement. Under the Download menu, click the Download link that corresponds to the .exe for your version of Windows.
Download the file jdk-13.interim.update.patch_windows-x64_bin.exe.
Note:
Verify the successful completion of file download by comparing the file size on the download page and your local drive. Alternatively, you can ensure that the downloaded file’s checksum matches the one provided on the Java SE Downloads page.
Running the JDK Installer
- Start the JDK 13 installer by double-clicking the installer’s icon or file name in the download location.
- Follow the instructions provided by the Installation wizard.
- After the installation is complete, delete the downloaded file to recover the disk space.
Installing the JDK Silently
Instead of double-clicking or opening the JDK installer, you can perform a silent, non interactive, JDK installation by using command-line arguments.
Install JDK in silent mode using the command:
jdk.exe /sNote:
The notation jdk stands for the downloaded installer file base name, such as jdk-13_windows-x64_bin.exe.
Setting the PATH Environment Variable
It is useful to set the PATH variable permanently for JDK 13 so that it is persistent after rebooting.
If you do not set the PATH variable, then you must specify the full path to the executable file every time that you run it. For example:
C:\> "C:\Program Files\Java\jdk-13\bin\javac" MyClass.javaTo set the PATH variable permanently, add the full path of the jdk-13\bin directory to the PATH variable. Typically, the full path is:
C:\Program Files\Java\jdk-13\binPATH variable on Microsoft Windows:- Select Control Panel and then System.
- Click Advanced and then Environment Variables.
- Add the location of the
binfolder of the JDK installation to thePATHvariable in System Variables.Note:
The
PATHenvironment variable is a series of directories separated by semicolons (;) and is not case-sensitive. Microsoft Windows looks for programs in thePATHdirectories in order, from left to right.You should only have one
bindirectory for a JDK in the path at a time. Those following the first instance are ignored.If you are not sure where to add the JDK path, append it.
The new path takes effect in each new command window that you open after setting the
PATHvariable.The following is a typical value for the
PATHvariable:C:\WINDOWS\system32;C:\WINDOWS;"C:\Program Files\Java\jdk-13\bin"Install Visual Studio Code
Visual Studio Code is a code editor redefined and optimized for building and debugging modern web and cloud applications.Features include support for debugging, syntax highlighting, intelligent code completion, snippets, code refactoring, and embedded Git
Download Visual Studio Code Now
Install Android Studio-(optional)
Android Studio is the official integrated development environment for Google’s Android operating system, built on JetBrains’ IntelliJ IDEA software and designed specifically for Android development.The fastest developer tools for building market-leading apps and accelerating performance. With an intelligent code editor, flexible build system, realtime profilers and emulators. Build rich experiences.
Install GIT
Installing on Windows
There are also a few ways to install Git on Windows. The most official build is available for download on the Git website. Just go to https://git-scm.com/download/win and the download will start automatically. Note that this is a project called Git for Windows, which is separate from Git itself; for more information on it, go to https://gitforwindows.org.
To get an automated installation you can use the Git Chocolatey package. Note that the Chocolatey package is community maintained.
Another easy way to get Git installed is by installing GitHub Desktop. The installer includes a command line version of Git as well as the GUI. It also works well with PowerShell, and sets up solid credential caching and sane CRLF settings. We’ll learn more about those things a little later, but suffice it to say they’re things you want. You can download this from the GitHub Desktop website.
Installing from Source
Some people may instead find it useful to install Git from source, because you’ll get the most recent version. The binary installers tend to be a bit behind, though as Git has matured in recent years, this has made less of a difference.
Install Gradle-(6.4.1 Recommended)
Installing manually
Step 1. Download the latest Gradle distribution-(6.4.1 Recommended)
The current Gradle release is version 6.7.1, released on 16 Nov 2020. The distribution zip file comes in two flavors:
- Binary-only
- Complete, with docs and sources
If in doubt, choose the binary-only version and browse docs and sources online.
Need to work with an older version? See the releases page.
Step 2. Unpack the distribution
Linux & MacOS users
Unzip the distribution zip file in the directory of your choosing, e.g.:
$ mkdir /opt/gradle
$ unzip -d /opt/gradle gradle-6.7.1-bin.zip
$ ls /opt/gradle/gradle-6.7.1
LICENSE  NOTICE  bin  getting-started.html  init.d  lib  media
Microsoft Windows users
Create a new directory C:\Gradle with File Explorer.
Open a second File Explorer window and go to the directory where the Gradle distribution was downloaded. Double-click the ZIP archive to expose the content. Drag the content folder gradle-6.7.1 to your newly created C:\Gradle folder.
Alternatively you can unpack the Gradle distribution ZIP into C:\Gradle using an archiver tool of your choice.
Step 3. Configure your system environment
Install Ionic Cordova
With Node and NPM setup, let’s install the Ionic and Cordova CLI.
[box type=”success” align=”aligncenter” class=”” width=””]npm install -g ionic cordova[/box]
Note: The -g means this is a global install, so for Windows you will need to open an Admin command prompt. For Mac/Linux, you might need to run the command with sudo.
App Development
First You Have to Buy The source code & Unzip It
- Now Open Vs Code editor.Change your details in app/config.xml. Change id, name, description, author, email, href
[box type=”info” align=”aligncenter” class=”” width=””]
[/box]
2.Open App source code
[box type=”info” align=”aligncenter” class=”” width=””]$ cd app[/box]
3.Add android and ios platform to your project
[box type=”info” align=”aligncenter” class=”” width=””]ionic cordova platform add android[/box]
To install plugin mstoreapp-mobile-app for WordPress follow these steps.
Install Redux Frameworks. If you have not installed yet – https://wordpress.org/plugins/redux-framework/
-
In WordPress admin panel.
Plugins > Add New > Upload plugin > Choose fileChose downloaded mstoreapp-mobile-app.zip file and Install and activate
OR
-
Unzip downloaded mstoreapp-mobile-app.zip and Upload the mstoreapp-mobile-app folder to the
wp-content/plugins/ directory. -
Activate the plugin through the Plugins menu in WordPress.
-
It’s required to turn on the WordPress permalink on
Settings > Permalinks -
Visit
WooCommerce > Settings > Advanced > REST APItab and tick the Enable REST API Checkbox -
Visit
WooCommerce > Settings > Advanced > Legacy APItab and tick the Enable Legacy REST API Checkbox -
Go to
API WooCommerce > Settings > Advanced > REST API > Keys/Apps > Add Key
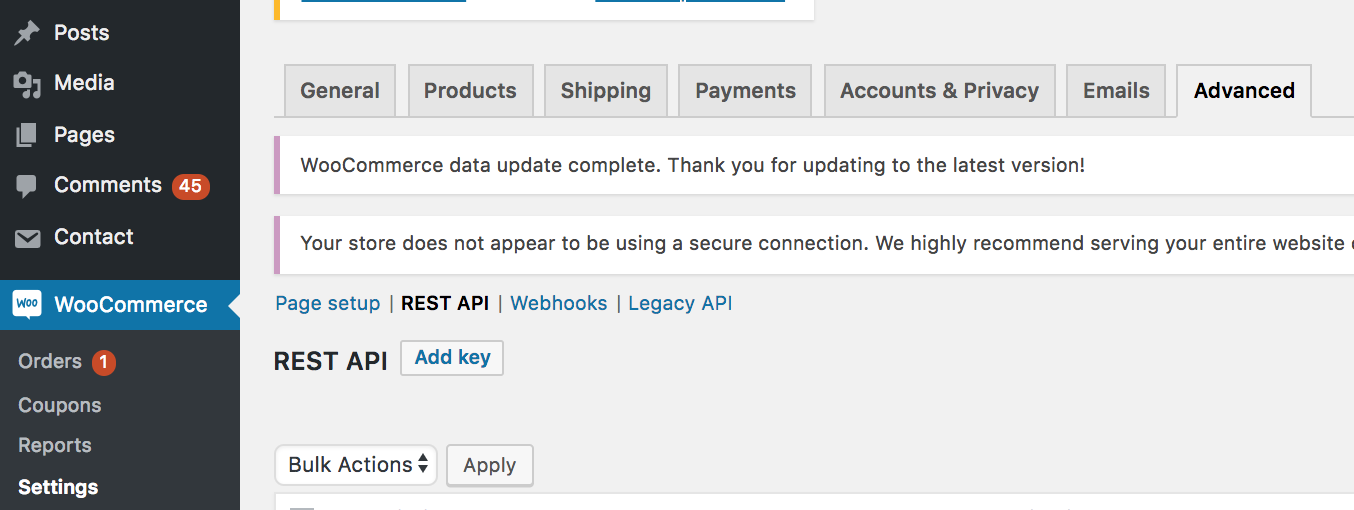
Select the user in user field and add a description. Choose level of access Read/Write. then select the button Generate API Key and WooCommerce will generate API keys for that user.
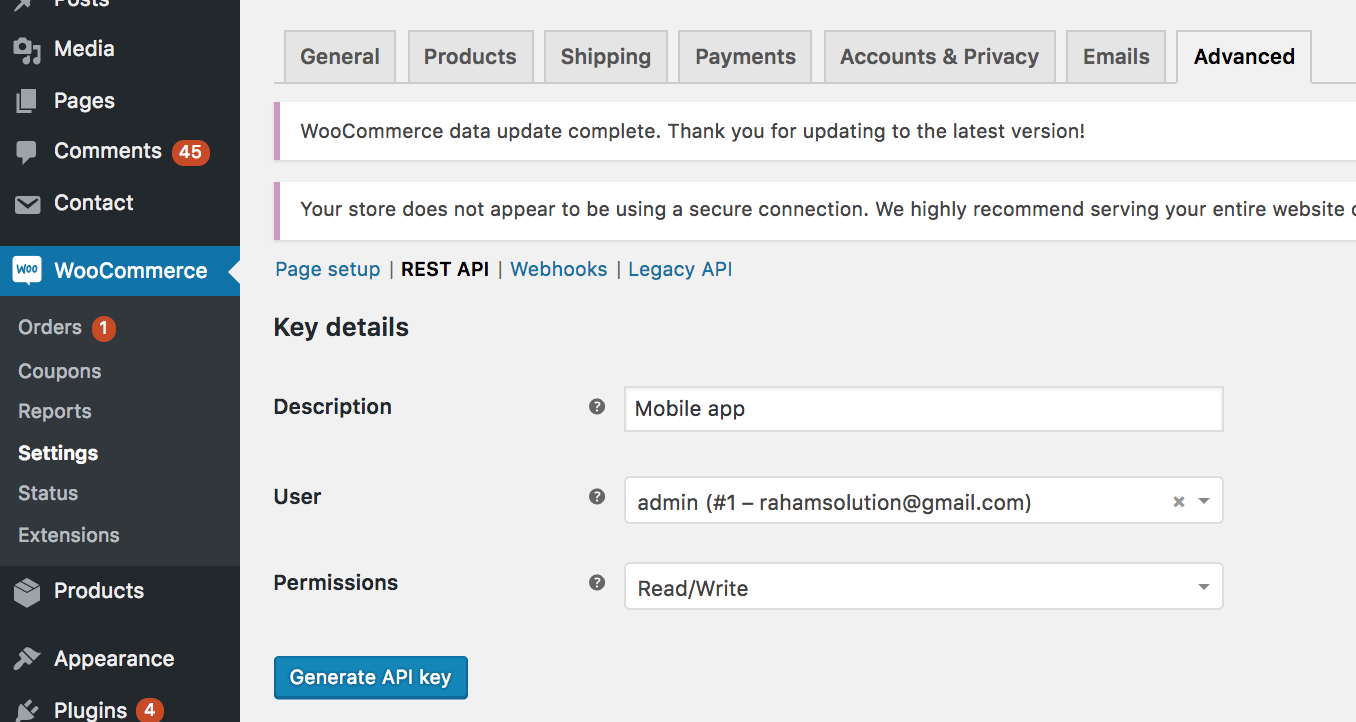
Now you should see two new keys, These two keys are your Consumer Key and Consumer Secret
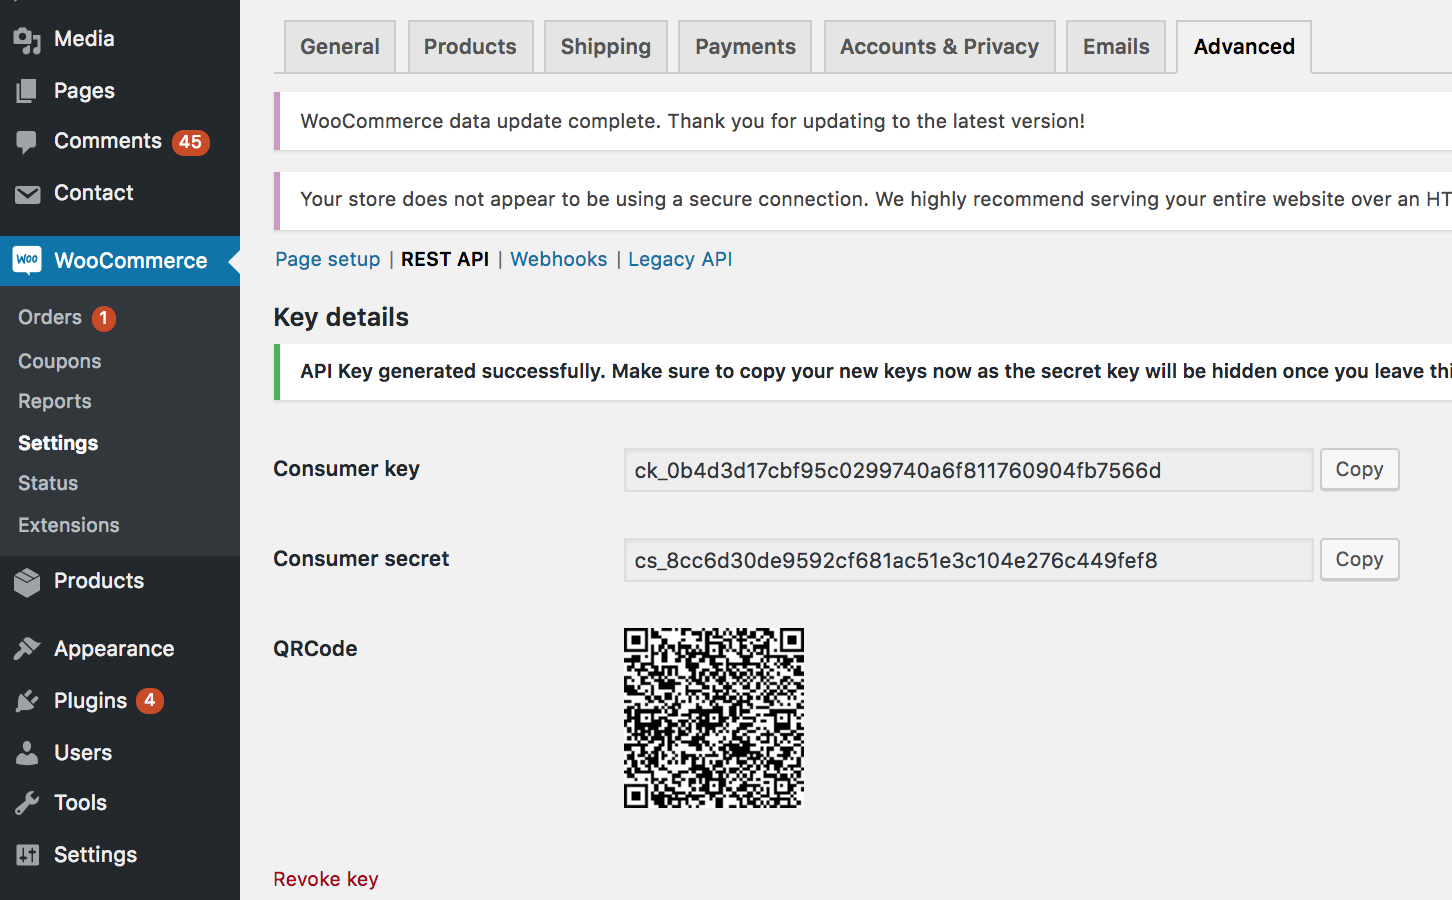
[box type=”info” align=”aligncenter” class=”” width=””]Add url, api keys in app/src/providers/service/config.ts file.[/box]
[box type=”info” align=”aligncenter” class=”” width=””] url: any = ‘URL_PLACEHOLDER’;
consumerKey: any = ‘CONSUMER_KEY_PLACEHOLDER’;
consumerSecret: any = ‘CONSUMER_SECRET_PLACEHOLDER’;[/box]
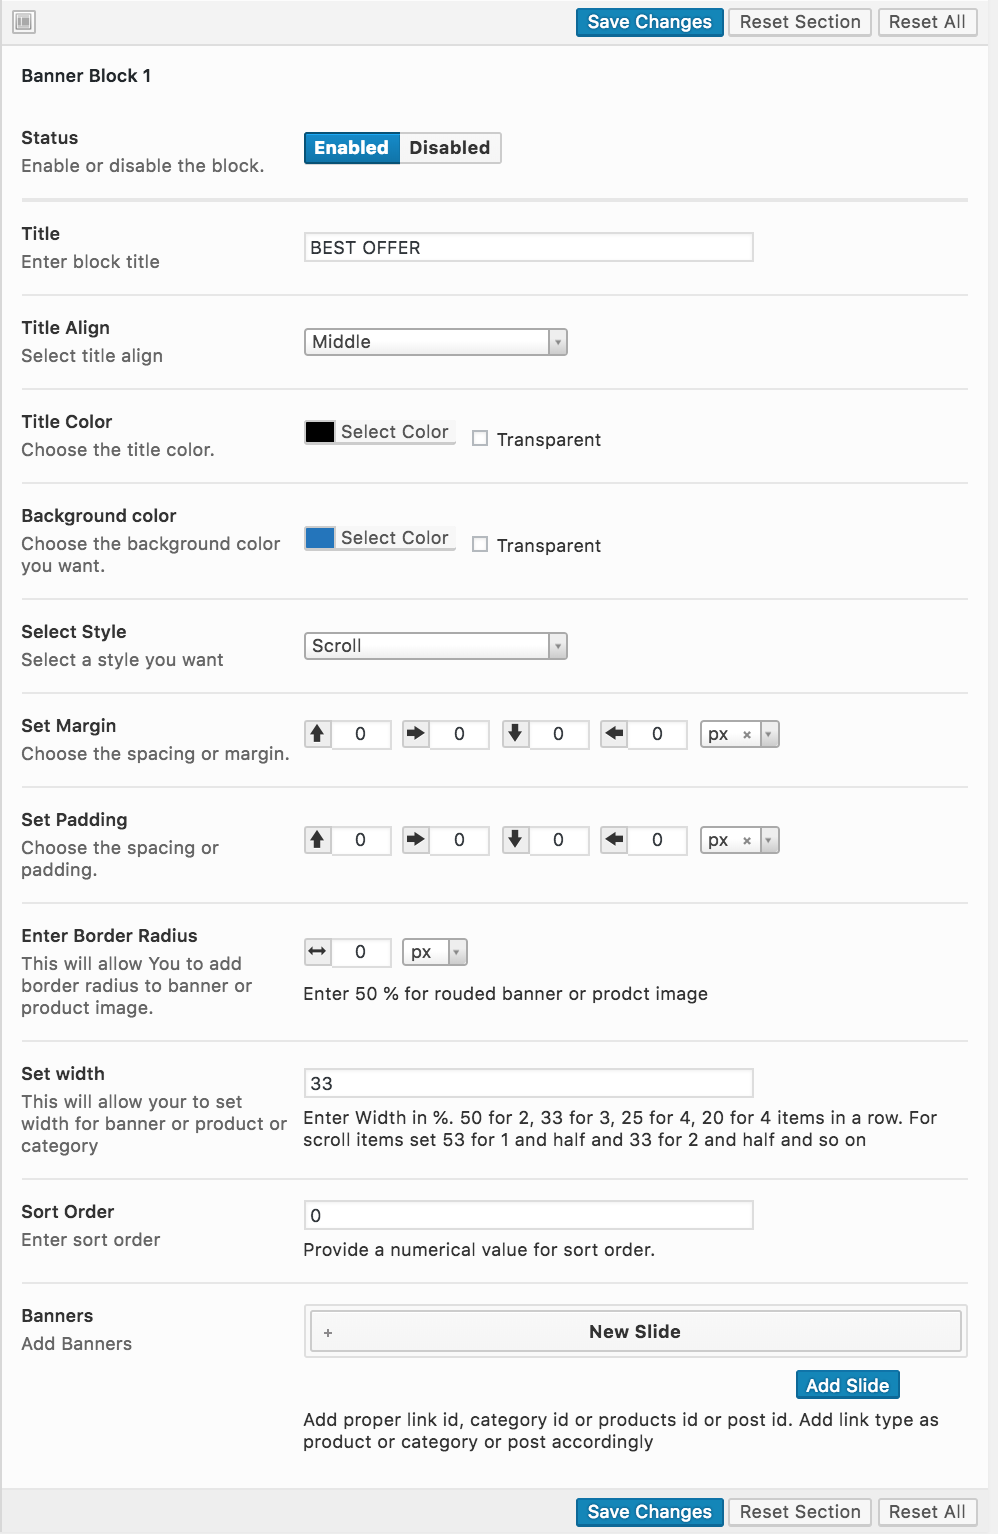
Go to WordPress > Mobile Options. Add Banners Blocks, Category Blocks, Product Blocks and Settings.
OneSignal Push Notification
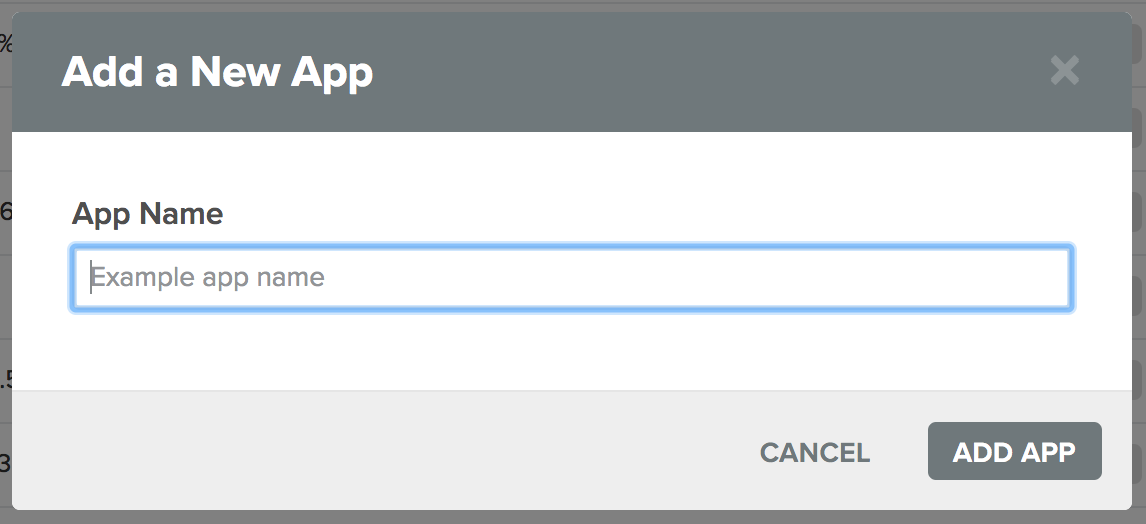
Login or Signup in https://onesignal.com/
Add an app, Add you app name and click ADD APP
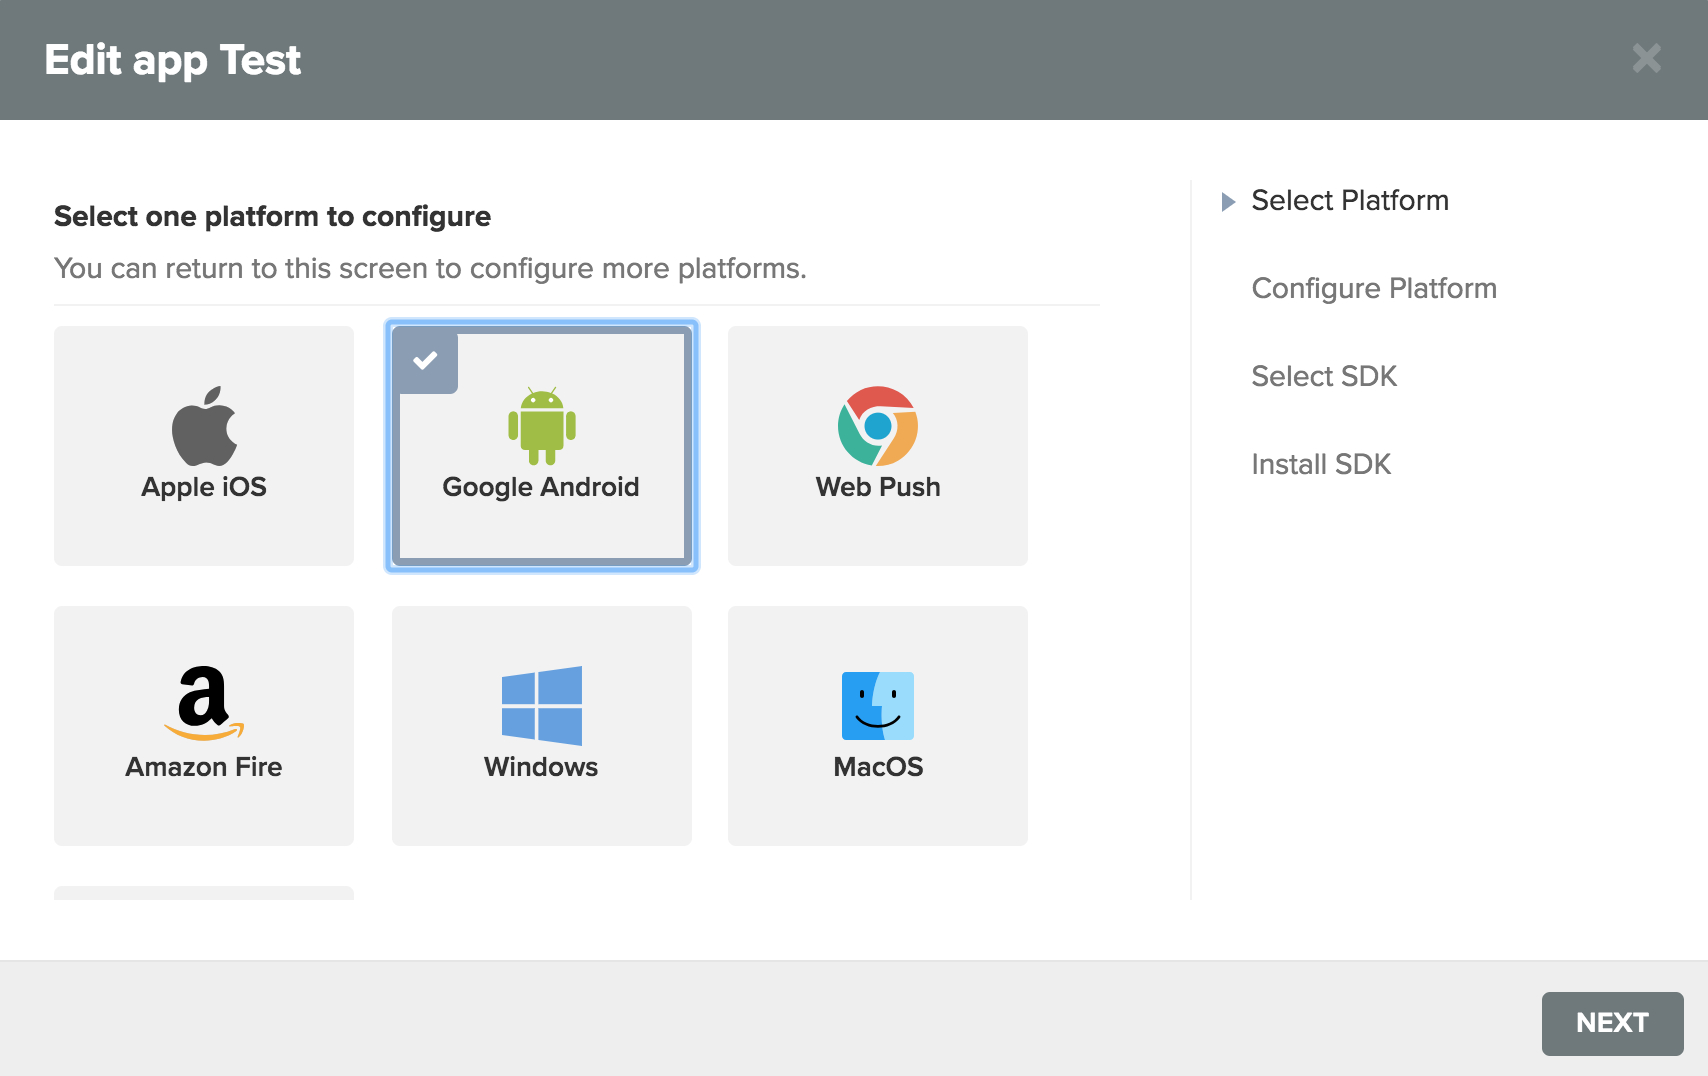
After that select platform and hit NEXT:
Next you need to get Firebase Server Key and Firebase Sender ID. You will get it with Following steps
In another browser tab Open Firebase Console https://console.firebase.google.com and sign in with your Google account.
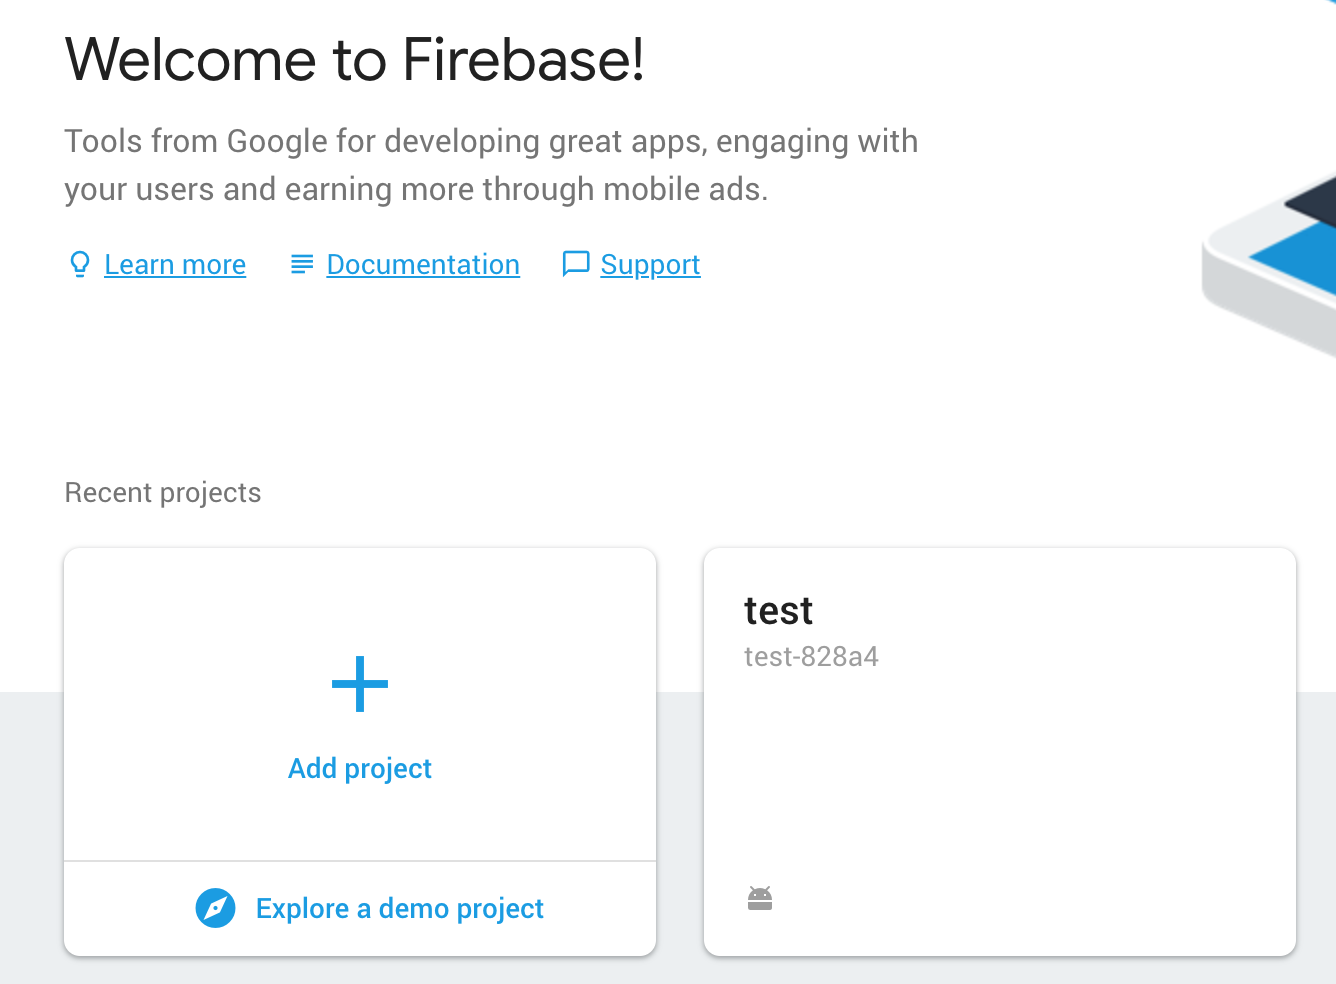
Press “CREATE NEW PROJECT” or select an existing one below.
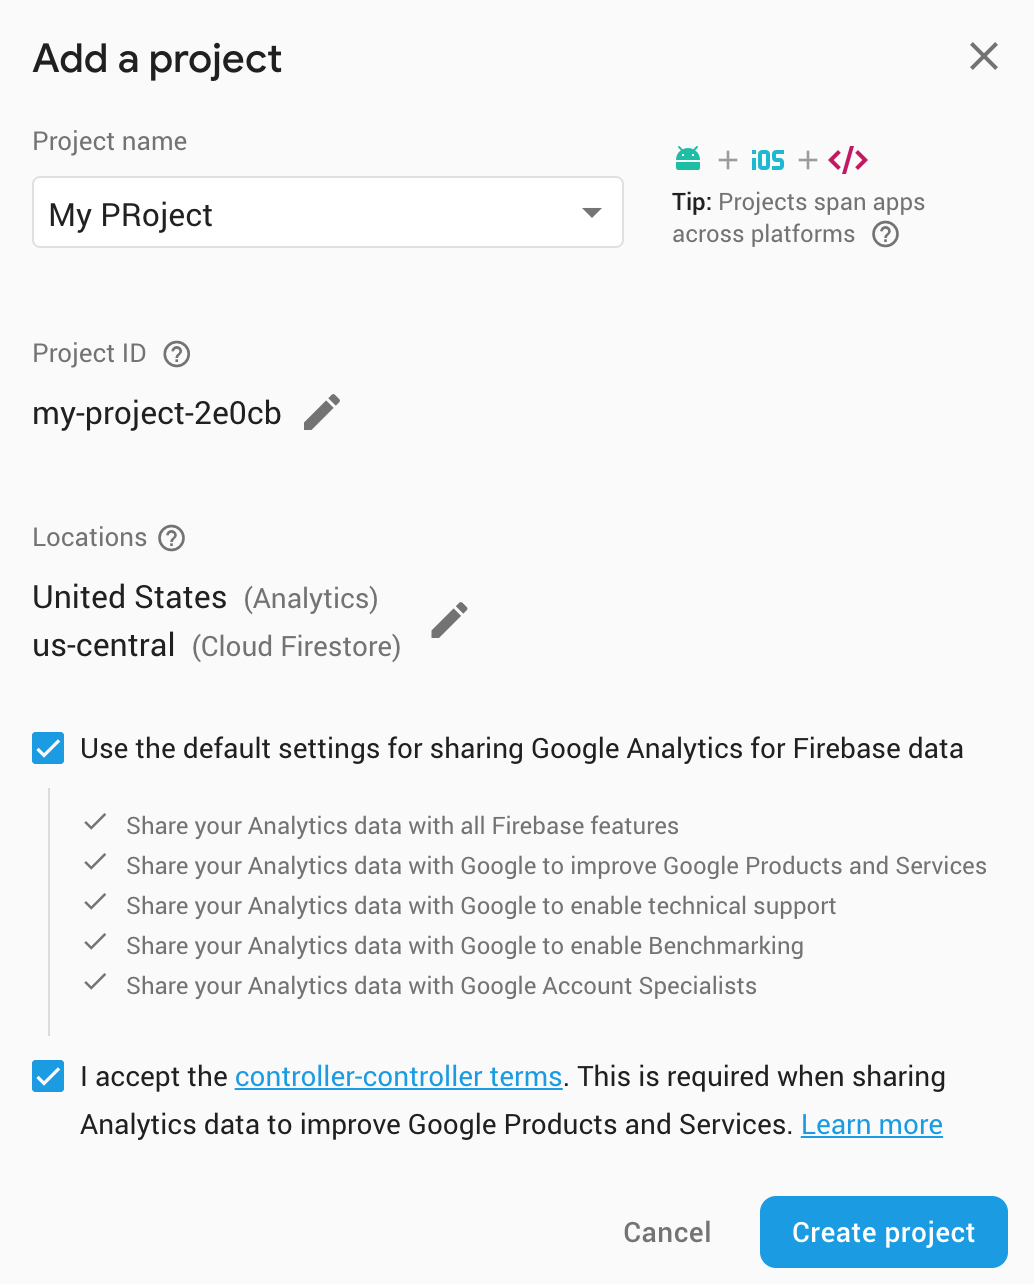
Enter a project name and press “CREATE PROJECT”.
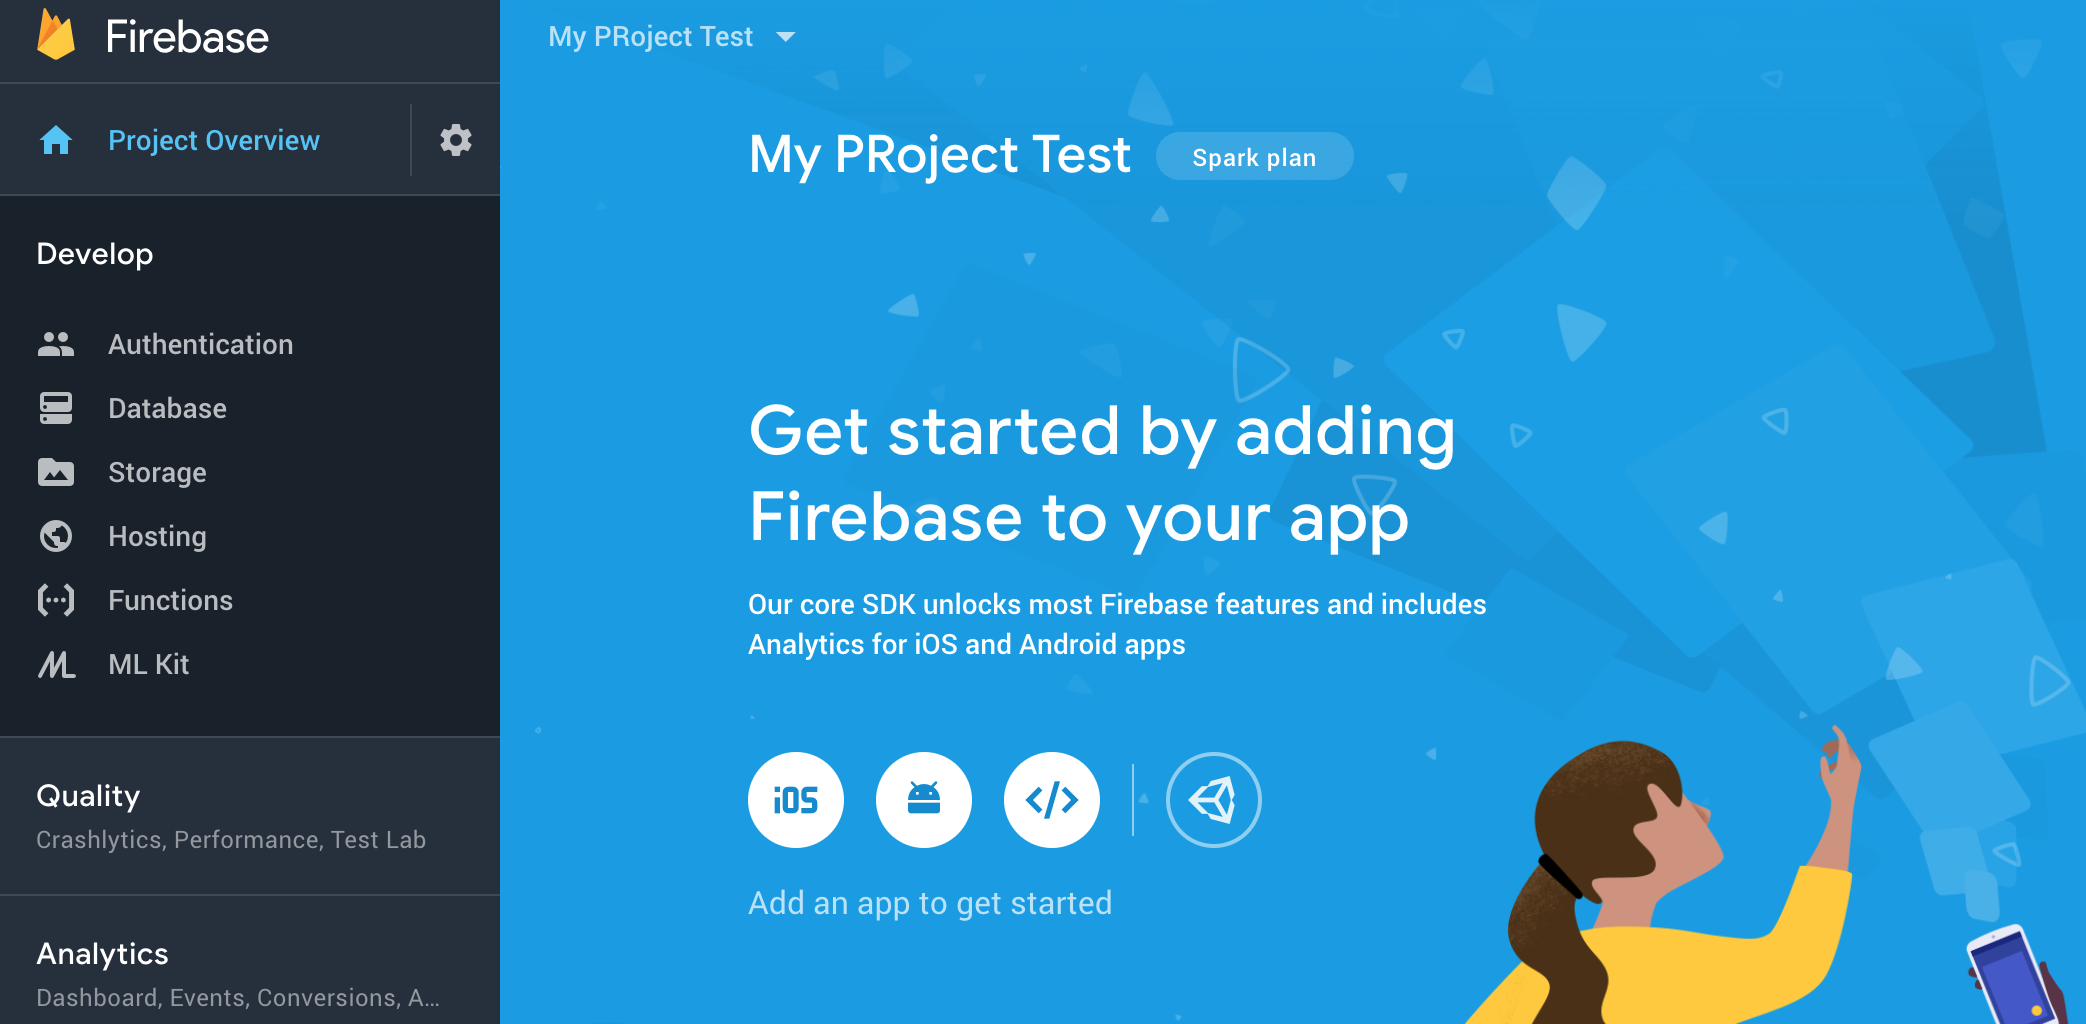
Go to project OverView
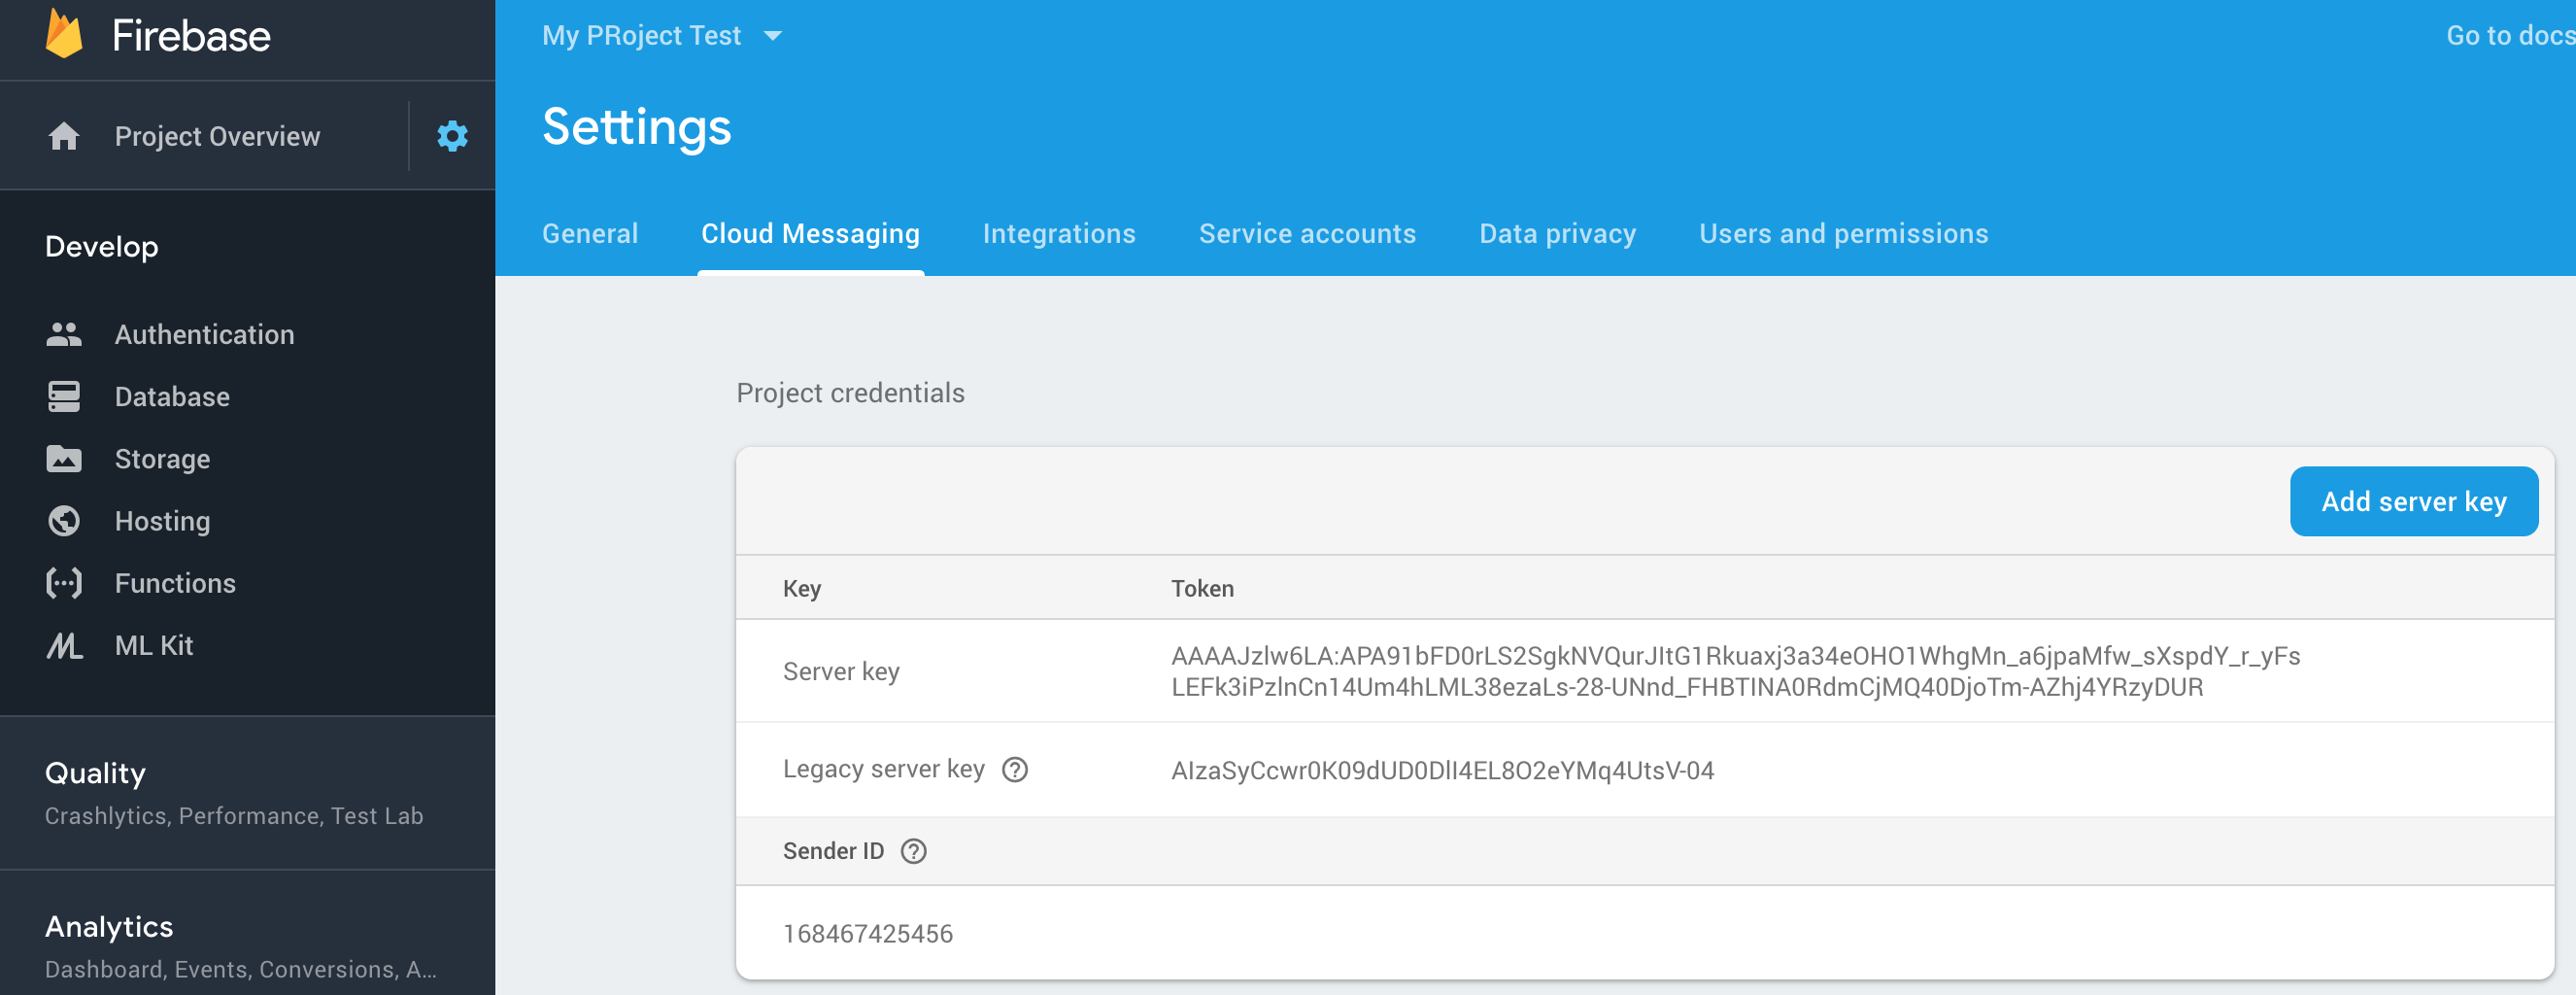
Click Settings -> Project Settings -> Cloud Messaging
Copy server key And sender Id
And Add it in OneSignal app and click SAVE

Select your target SDK PhoneGap, Cordova, ionic and hit NEXT

Copy Your App ID
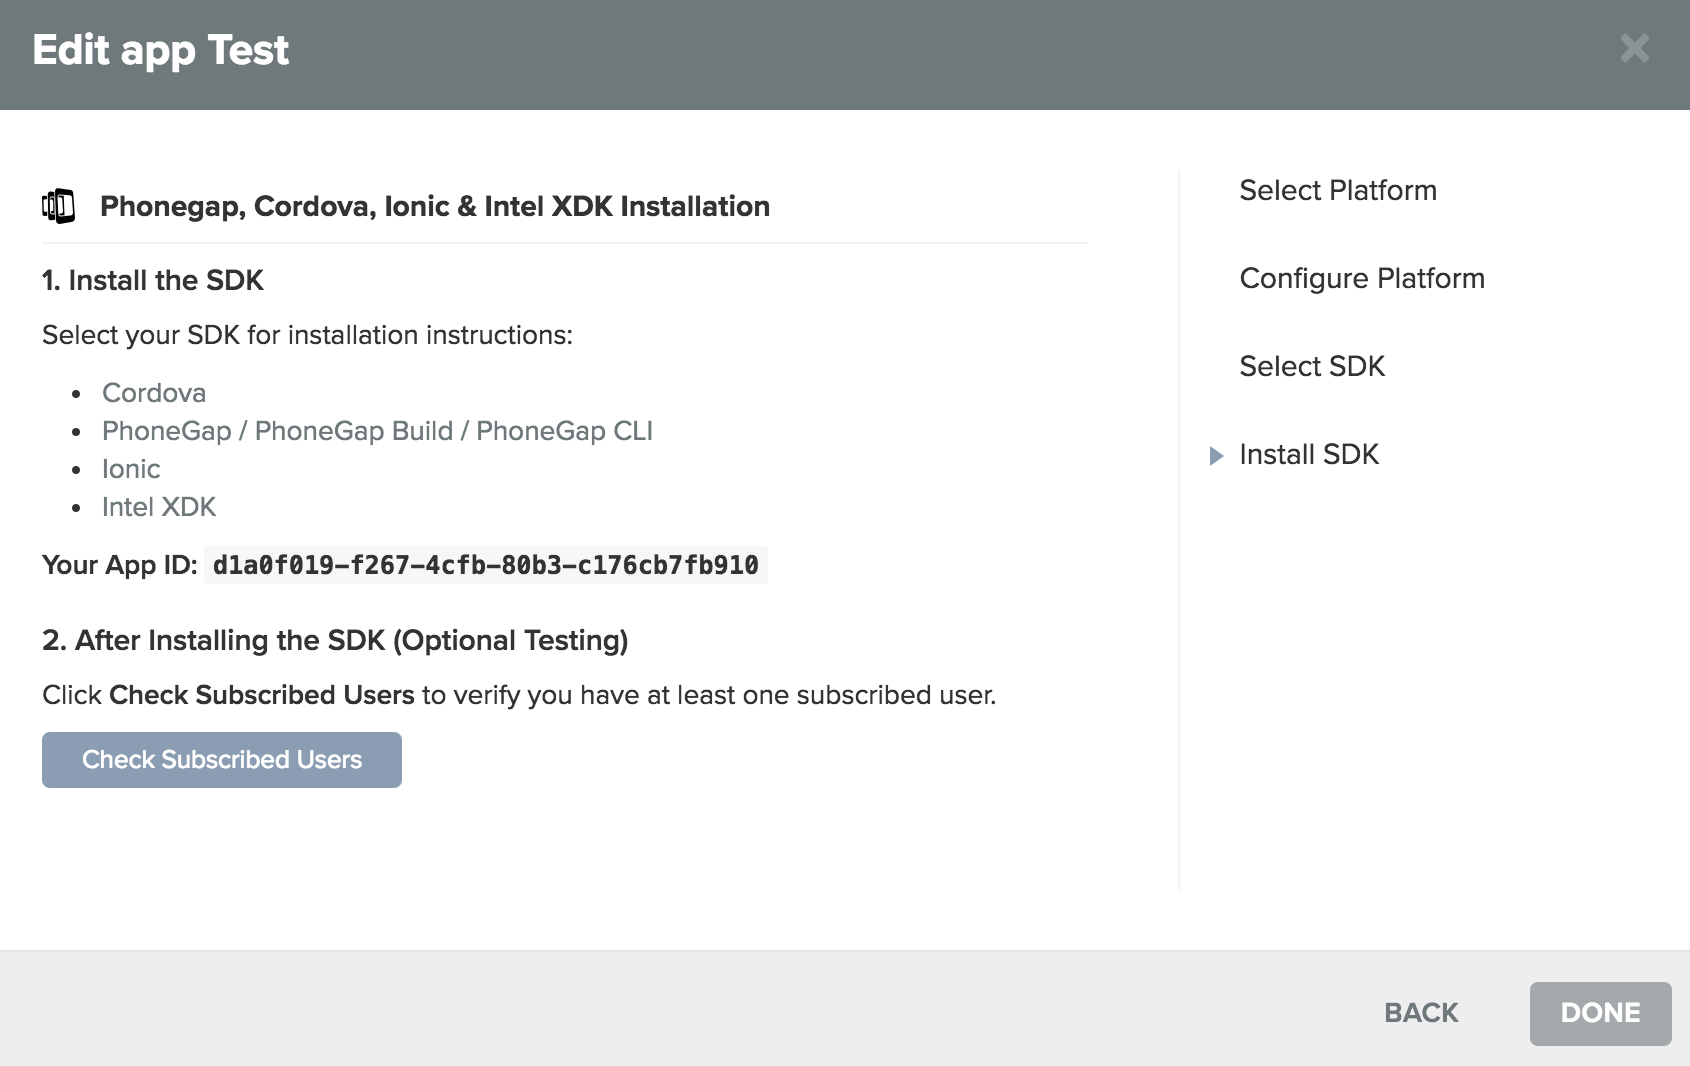
Add in OneSignal APP ID, Firebase Server Key and Firebase Sender ID in WordPress -> Mobile App -> Settings
After that Build apk and Subscribe at least one user by launching your app on mobile. Then you need to hit check subscribed user and click DONE
Dynamic Blocks
Go to WordPress > Mobile Options > Banner Blocks
.png?alt=media&token=e9544ac5-8a17-463c-951f-bff0ea915e40)
-
Status – will allow you to enable or disable blocks
-
Title – This will allow you to add a title for the blocks
-
Title align – Allow you to set the alignment of the title inside blocks. select none to hide the title
-
Title Color – Color of text inside the block. Set Back or Dark color for a light background, Light color for dark back
-
Background Color – Allow you to set background color for blocks
-
Select Style – Allow you to set style slider, grid, or scroll (Horizontal scroll) for banners in the block
-
Set Margin – Allow you to set-top, right, bottom, left margin for the block
-
Set Padding – Allow you to set-top, right, bottom, left padding for the block
-
Margin between banner – Allow you to set a gap between banners
-
Enter Border Radius – Allow you to set border -radius for banners
-
Set Width – Allow you to set the width in % of screen width for Banner. set 100 for one banner in a row. 50 for two banners in a row. 25 for 4 banners in a row.
-
Sort Order – Allow you to set the sort order for blocks. Blocks will appear on the mobile app according to sort order. 0 comes on top and higher-order number comes last
-
Banners – allow you to add multiple banners as block
-
Link Type – Allow to link banner image to product, category, or post. enter product or category or post or stores ( for multivendor only ) in this field. leave blank if you don’t want to link banner
-
Link Id – Allow you to set link id for the banner. Enter product id or category id or post id according to what you have entered in Link Type for stores Link id is not required to enter. in this field. leave blank if you don’t want to link banner
-
Support banner blocks options as mentioned Banner Blocks
-
Main Category id – Allow you to set main category id whose subcategory will appear in blocks
Support banner blocks options as mentioned Banner Blocks
-
Filter Product By – Allow you to set filter products by category id or product tag id
-
Category id or Product tag id – Enter category id or Product tag id according to the previous option. Products under the category or tagged products will appear under blocks accordingly.
Support banner blocks options as mentioned Banner Blocks
-
Flash Sale End Date – Allow you to set an end date for flash sale
-
Filter Product By – Allow you to set filter products by category id or product tag id
-
Category id or Product tag id – Enter category id or Product tag id according to the previous option. Products under the category or tagged products will appear under blocks accordingly.
Geolocation
Enable location filter in WordPress > Mobile Options > Geo Locations
Add google map API key in app > src index.html replace YOUR_API_KEY with your google map API key.
[box type=”info” align=”aligncenter” class=”” width=””]<script src=”https://maps.google.com/maps/api/js?key=YOUR_API_KEY&libraries=places”></script>[/box]
Enable Geolocation API and Geocoding API for your google map API key
1) Login to your google cloud console – https://console.cloud.google.com/apis/library
2) Search for Geolocation API
3) Click on Geolocation API and enable it
4) Search for Geocoding API
5) Click on Geocoding API and enable it
6) Search for Places API
7) Click on Places API and enable it
Social Login
Read this document to avoid any mistake or conflict
[button color=”green” size=”small” link=”https://github.com/EddyVerbruggen/cordova-plugin-googleplus” icon=”fas fa-book-reader” target=”true” nofollow=”false”]READ THIS[/button]
Uncomment Facebook and GooglePlus import in src/app/app.module.ts and src/app/account/login/login.ts
[box type=”info” align=”aligncenter” class=”” width=””]
//import { Facebook } from ‘@ionic-native/facebook/ngx’;
//import { GooglePlus } from ‘@ionic-native/google-plus/ngx’;
[/box]
Uncomment Facebook and GooglePlus in providers section of src/app/app.module.ts
[box type=”info” align=”aligncenter” class=”” width=””]
// Facebook,
// GooglePlus,
[/box]
Uncomment GooglePlus, Facebook in constructor in src/app/account/login/login.ts file
[box type=”info” align=”aligncenter” class=”” width=””]/*private googlePlus: GooglePlus, private fb: Facebook*/[/box]
Uncomment Social login in src/app/account/login/login.ts file
[box type=”info” align=”aligncenter” class=”” width=””]
/*googleLogin(){ this.googleLogingInn = true; this.googlePlus.login({}) .then(res => { this.googleStatus = res; this.api.postItem(‘google_login’, { “access_token”: this.googleStatus.userId, “email”: this.googleStatus.email, “first_name”: this.googleStatus.givenName, “last_name”: this.googleStatus.familyName, “display_name”: this.googleStatus.displayName, “image”: this.googleStatus.imageUrl }).subscribe(res => { this.status = res; if (this.status.errors) { this.errors = this.status.errors; } else if (this.status.data) { this.settings.customer.id = this.status.ID; if (this.platform.is(‘cordova’)){ this.oneSignal.getIds().then((data: any) => { this.form.onesignal_user_id = data.userId; this.form.onesignal_push_token = data.pushToken; }); this.api.postItem(‘update_user_notification’, this.form).subscribe(res =>{}); } if(this.status.allcaps.dc_vendor || this.status.allcaps.seller || this.status.allcaps.wcfm_vendor){ this.settings.vendor = true; } this.navCtrl.navigateBack(‘/tabs/account’); } this.googleLogingInn = false; }, err => { this.googleLogingInn = false; }); this.googleLogingInn = false; }) .catch(err => { this.googleStatus = err; this.googleLogingInn = false; }); } facebookLogin(){ this.facebookLogingInn = true; this.facebook.login([‘public_profile’, ‘user_friends’, ’email’]) .then((res: FacebookLoginResponse) => { this.googleStatus = res; this.api.postItem(‘facebook_login’, { “access_token”: this.googleStatus.userId, }).subscribe(res => { this.status = res; if (this.status.errors) { this.errors = this.status.errors; } else if (this.status.data) { this.settings.customer.id = this.status.ID; if (this.platform.is(‘cordova’)){ this.oneSignal.getIds().then((data: any) => { this.form.onesignal_user_id = data.userId; this.form.onesignal_push_token = data.pushToken; }); this.api.postItem(‘update_user_notification’, this.form).subscribe(res =>{}); } if(this.status.allcaps.dc_vendor || this.status.allcaps.seller || this.status.allcaps.wcfm_vendor){ this.settings.vendor = true; } this.navCtrl.navigateBack(‘/tabs/account’); } this.facebookLogingInn = false; }, err => { this.facebookLogingInn = false; }); this.facebookLogingInn = false; }) .catch(e => { this.googleStatus = e; this.facebookLogingInn = false; }); }*/
[/box]
Uncomment Social login buttons in src/app/account/login/login.html file
[box type=”info” align=”aligncenter” class=”” width=””] <!–div>
<ion-row class=”login-div”>
<ion-col class=”col1″> <button ion-button outline full type=”submit” text-uppercase [disabled]=”disableSubmit” (click)=”facebookLogin()”>{{“Facebook” | translate}}</button> </ion-col>
<ion-col class=”col2″> <button ion-button outline full type=”submit” text-uppercase [disabled]=”disableSubmit” (click)=”gmailLogin()”>{{“Google” | translate}}</button> </ion-col>
</ion-row>
</div–> [/box]
Google Authentication
-
Get your credentials from Google.
-
Install the Google native plugin.
1. Get your credentials from Google.
Go to https://console.firebase.google.com and create a project.
Once project is added we need to create both ios and android app in firebase console https://console.firebase.google.com.
let’s start with the iOS one,
Choose your project. Click settings icon and then select project settings
Click on ADD APP and then choose platform
It will ask you an iOS Bundle ID, to get it, go into your app’s config.xml file and copy the package id you’re using, it’s the one that looks like (id=”com.ionicframework.something”) from your config.xml file.
Click REGISTER APP. It will generate GoogleService-Info.plist file.
Click on Download GoogleService-Info.plist file, which is a config file for iOS.
After downloading GoogleService-Info.plist file click on Continue > Continue > FINISH.
Copy GoogleService-Info.plist file to your project root directory.
Once we add iOS app, we need to add Android app.
Click ADD APP and choose android platform
It will ask you an Android Bundle ID, to get it, go into your app’s config.xml file and copy the package id you’re using, it’s the one that looks like (id=”com.ionicframework.something”) from your config.xml file.
Click REGISTER APP. It will generate google-services.json file
Click on Download google-services .json file, which is a config file for Android.
After downloading google-services.json file click on Continue > FINISH
Copy google-services.json file to your project root directory. that is app folder
Add CLIENT_ID in src/providers/config.ts file
2. Install the GooglePlus Cordova Plugin.
[box type=”success” align=”aligncenter” class=”” width=””]get REVERSED_CLIENT_ID in GoogleService-Info.plist file[/box]
Run following command to install GooglePlus Cordova plugin. CLIENT ID with REVERSE CLIEND ID
[box type=”success” align=”aligncenter” class=”” width=””]ionic cordova plugin add cordova-plugin-googleplus –variable REVERSED_CLIENT_ID=CLIENT_ID[/box]
[box type=”success” align=”aligncenter” class=”” width=””]npm install –save @ionic-native/google-plus[/box]
Facebook Authentication
More detail – https://ionicframework.com/docs/native/facebook https://github.com/jeduan/cordova-plugin-facebook4
Make sure you’ve registered your Facebook app with Facebook and have an APP_ID
1.First have to create a new Facebook App inside of the Facebook developer portal at https://developers.facebook.com/apps.
Retrieve the App ID and App Name

2.Add android and ios platform. Go to settings>basics as shown below and click +Add Platform.
3.Fill required fields while adding android and ios platforms and save changes.
4.Final step, Change status of the app from development mode to Live .
Install the Cordova and Ionic Native plugins. where App ID and App Name are the values from the Facebook Developer portal.
[box type=”success” align=”aligncenter” class=”” width=””]ionic cordova plugin add cordova-plugin-facebook4 –variable APP_ID=”123456789″ –variable APP_NAME=”myApplication[/box]
[box type=”success” align=”aligncenter” class=”” width=””]npm install –save @ionic-native/facebook[/box]
Frequently asked questions (FAQ)
Add android:usesCleartextTraffic=”true” in platform/android/app/src/main/AndroidManifest.xml file.

[box type=”success” align=”aligncenter” class=”” width=””] <uses-permission android:name=”android.permission.INTERNET” />
<application android:usesCleartextTraffic=”true” android:hardwareAccelerated=”true” android:icon=”@mipmap/ic_launcher” android:label=”@string/app_name” android:networkSecurityConfig=”@xml/network_security_config” android:supportsRtl=”true”>[/box]
Add you site Domain in app/resources/android/xml/network_security_config.xml file. Need to add this each time when you remove and add android platform. in the example below replace example.com with your domain
[box type=”success” align=”aligncenter” class=”” width=””] <?xml version=”1.0″ encoding=”utf-8″?>
<network-security-config>
<domain-config cleartextTrafficPermitted=”true”>
<domain includeSubdomains=”true”>localhost</domain>
<domain includeSubdomains=”true”>example.com</domain>
</domain-config>
</network-security-config> [/box]
How to change icon and splash screen?
Replace your icon (1024×1024 px png) and splash (2732×2732 px png, Graphics in center of 1024 sq px) in src/resources folder. Use the following command to generate icon and splash screen
[box type=”success” align=”aligncenter” class=”” width=””]ionic cordova resources[/box]
How to change the logo and other images?
[box type=”success” align=”aligncenter” class=”” width=””]Replace your logo and other images in src/assets/images/[/box]
ionic-app-scripts error
If you get error like node_modules\.bin\ionic-app-scripts’ is not recognized as an internal or external command
Try run following command
[box type=”success” align=”aligncenter” class=”” width=””]npm install @ionic/app-scripts@latest –save-dev[/box]
node-sass error
If you get error like Node Sass does not yet support your current environment
Try run following command
[box type=”success” align=”aligncenter” class=”” width=””]npm rebuild node-sass –force sudo npm install –save-dev –unsafe-perm node-sass[/box]
Error related to Node Modules
If you get any error like related to node modules. You can remove and npm install node modules by following commands
[box type=”success” align=”aligncenter” class=”” width=””]rm -rf node_modules
rm package-lock.json
npm install[/box]
ng is not recognized as internal or external command
Run following command to install angular cli
[box type=”success” align=”aligncenter” class=”” width=””]npm install -g @angular/cli[/box]
To update ionic project
You can update your ionic project by following commands
[box type=”success” align=”aligncenter” class=”” width=””]npm install -i @ionic/angular@latest[/box]
Error at Execution failed for task
[box type=”success” align=”aligncenter” class=”” width=””]Run: 1.ionic cordova clean android 2.ionic cordova build android[/box]
Error at Can’t Build on Android AAPT
[box type=”success” align=”aligncenter” class=”” width=””]
Run: 1. ionic cordova platform rm android
2. ionic cordova plugin add cordova-plugin-androidx
3. ionic cordova plugin add cordova-plugin-androidx-adapter
4. ionic cordova platform add android[/box]
Error at package android.support.v4.content does not exist
[box type=”success” align=”aligncenter” class=”” width=””]Run: 1. ionic cordova plugin add cordova-plugin-androidx
2. ionic cordova plugin add cordova-plugin-androidx-adapter[/box]
Error at ‘gradle’
[box type=”success” align=”aligncenter” class=”” width=””]Check : gradle -v If more than 6.4.1:
1. ionic cordova platform rm android.
2. ionic cordova platform add [email protected] [/box]
Error at ‘Could not find an installed version of Gradle’
[box type=”success” align=”aligncenter” class=”” width=””]Steps: 1 install gradle and go inside gradle folder->bin.
2 copy path till bin. (eg)C:\Program Files\gradle- 6.4.1\bin
3. goto Mycomputer(This pc)->Right click->Properties- >Advanced System Settings->Advanced- >Environment variables->User variables->select path->edit->paste
4. goto Mycomputer(This pc)->Right click->Properties- >Advanced System Settings->Advanced- >Environment variables->System variables->select path->edit->paste[/box]
Error at Failed to find ‘ANDROID_HOME’ (or) Error at Failed to find ‘ANDROID_SDK_ROOT
[box type=”success” align=”aligncenter” class=”” width=””]Steps: 1 Goto Android Sdk path and copy till sdk (eg)C:\Users\Admin\AppData\Local\Android\Sdk
2 Goto Mycomputer(This pc)->Right click->Properties- >Advanced System Settings->Advanced- >Environment variables->User variables->new
3 Enter: -> variable name:ANDROID_HOME. -> variable value:paste sdk path[/box]
Error at Failed to find ‘JAVA_HOME’
[box type=”success” align=”aligncenter” class=”” width=””]Steps: 1 Goto Java path and copy till jdk(version) (eg)C:\Program Files\Java\jdk1.8.0_241
2 Goto Mycomputer(This pc)->Right click->Properties- >Advanced System Settings->Advanced- >Environment variables->User variables->new
3 Enter: -> variable name:JAVA_HOME. -> variable value:paste java path[/box]
Mobile option is not visible in admin panel
Make sure you have installed redux frameworks – https://wordpress.org/plugins/redux-framework/.
Blank white screen after splash and taking more time to load
Debug apk takes time to load on some Android devices. while this is normal for debugging apk. Build –prod to load app faster.
[box type=”success” align=”aligncenter” class=”” width=””] ionic cordova build android –prod[/box]
Blank page on ionic serve
[box type=”success” align=”aligncenter” class=”” width=””]ionic serve –port 8080[/box]


