WCFM APP SETUP
1.Overview #
WCFM Marketplace brings you FREE Seller Mobile App. Now give your sellers/vendors power to manage their business on-the-go.
Your sellers/vendor are going to simply love this!
The requirement for a seller app is not optional anymore. Every marketplace needs it just to stay in the competition.
This app makes it easy for vendors to manage their products, analyze sales and track orders right from a mobile or tablet.
How it’s going to help your vendors and you?
- Let your vendors do business whenever they want and from wherever they are.
- Keeping track of sales with real-time notifications.
- Edit product on the go. Update price, quantity or name.
- View all inquiries by customers.
- View all orders received and update order status when required
In upcoming days, we are intended to add more and more features in this list. Happy selling!
2.System Requirements #
To use this APP you have to install these require plugins to your site –
- WooCommerce
- WC Frontend Manager – WCFM Core
- WC Multivendor Marketplace – WCFM Marketplace
- WC Multivendor Marketplace – REST API – WCFM Marketplace REST API
- JWT Authentication for WP REST API – REST API Authentication
3.Auth Setup #
The authentication of the App to the multivendor website is done by JSON Web Token (JWT) method.
For using this authentication system to work on your WordPress multivendor website you need to install and activate JWT Authentication for WP REST API plugin in your website.
Setting Up and Configuring the JWT Authentication for WP REST API plugin:
- Enable HTTP Authorization Header: The plugin requires HTTP Authorization Header to be enabled in your server. If it is not enabled by default you can ask the hosting provider for the same.
Most of the shared hosting disables the HTTP Authorization Header by default. To enable this option you’ll need to edit your .htaccess file adding the following
RewriteEngine on

RewriteCond %{HTTP:Authorization} ^(.*)

RewriteRule ^(.*) - [E=HTTP_AUTHORIZATION:%1]
WPENGINE
To enable this option you’ll need to edit your .htaccess file adding the following
SetEnvIf Authorization "(.*)" HTTP_AUTHORIZATION=$1 Configuring the Secret Key: The JWT needs a secret key to sign the token this secret key must be unique and never revealed. To add the secret key edit your wp-config.php file and add a new constant called JWT_AUTH_SECRET_KEY
define('JWT_AUTH_SECRET_KEY', 'your-top-secret-key');To enable the Cross-origin Support, edit your wp-config.php file and add a new constant called JWT_AUTH_CORS_ENABLE
define('JWT_AUTH_CORS_ENABLE', true);
*NOTE: The JWT_AUTH_SECRET_KEY and JWT_AUTH_CORS_ENABLE should be defined before ‘WP_DEBUG’ definition in the wp-config.php preferably just after the NONCE_SALT definition.
4.APP Download & Install #
Well, first version of Store Manager APP is only available for Android and it’s totally FREE.
You may download this from Google Play Store to your android mobile very easily. You just have to go into Google Play Store app and search for “WCFM Store Manager“.
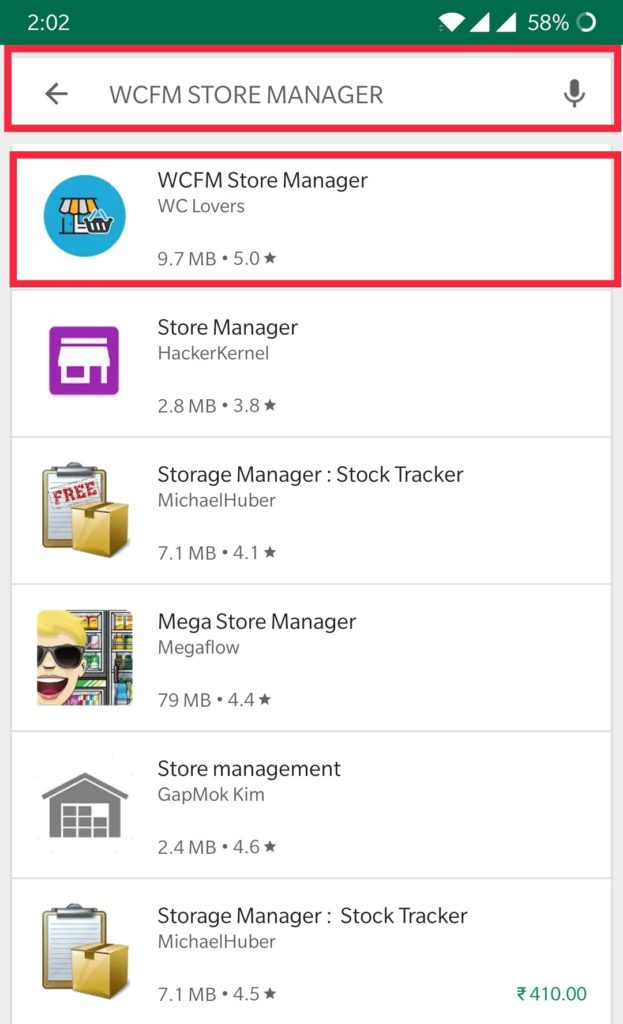
Install this to your phone.
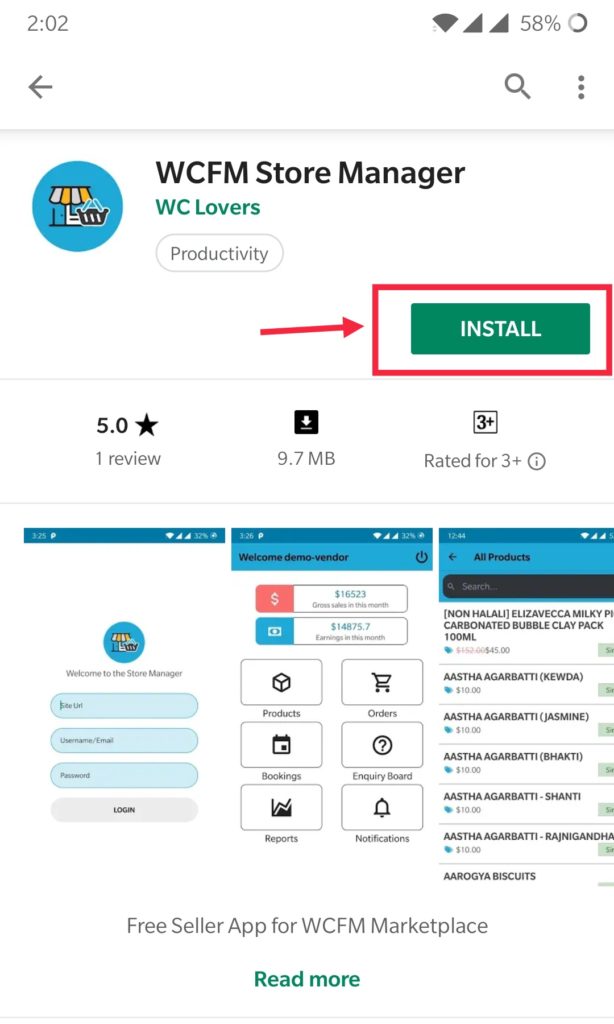
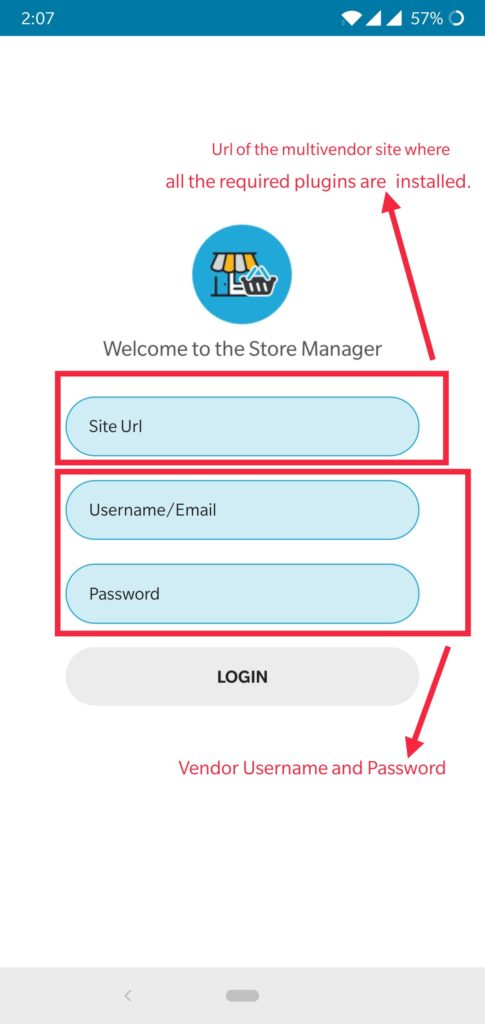
Now, this APP is already in your phone, option it. You will see a login form with three fields –
- Site URL – this should be your multi-vendor site URL
- Username – vendor user name
- Password – vendor user password
5.APP Modules #
After login to the APP you will see Store Manager APP dashboard with it’s all components. You may go to other sections from here.
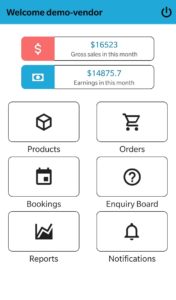
Available Modules –
- Products Listing
- Products Manage (Edit Basic Details)
- Products Add (Simple Products )
- Orders Listing
- Order Status Update
- Bookings
- Booking Status Update
- Enquiry
- Enquiry Reply
- Review View
- Reviews Approve/Reject
- Reports
- Notifications
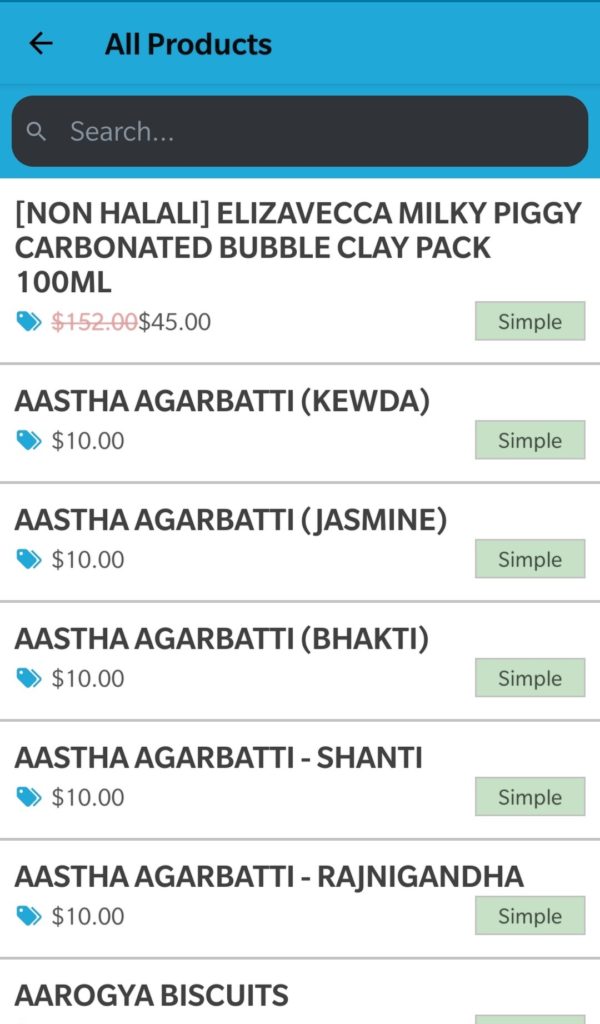
Vendors will see all their products under APP product section. They also allowed to search for a particular product.
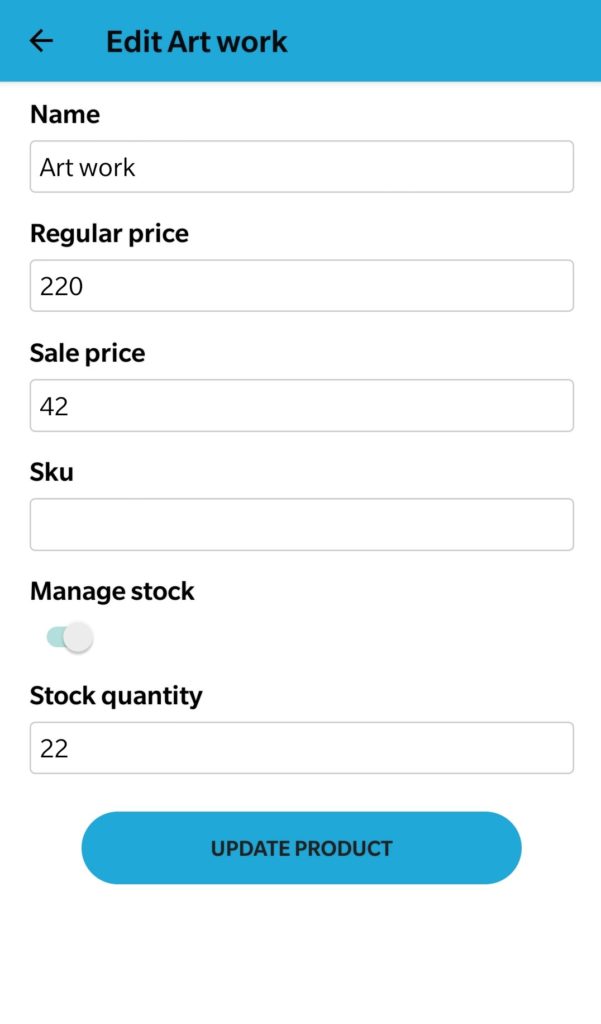
Vendor may also edit some important fields for the products. Price, Stock etc …
5.2.Orders #
Order section will show all orders for their products and most important details.
They also know what will be their commission for the order.
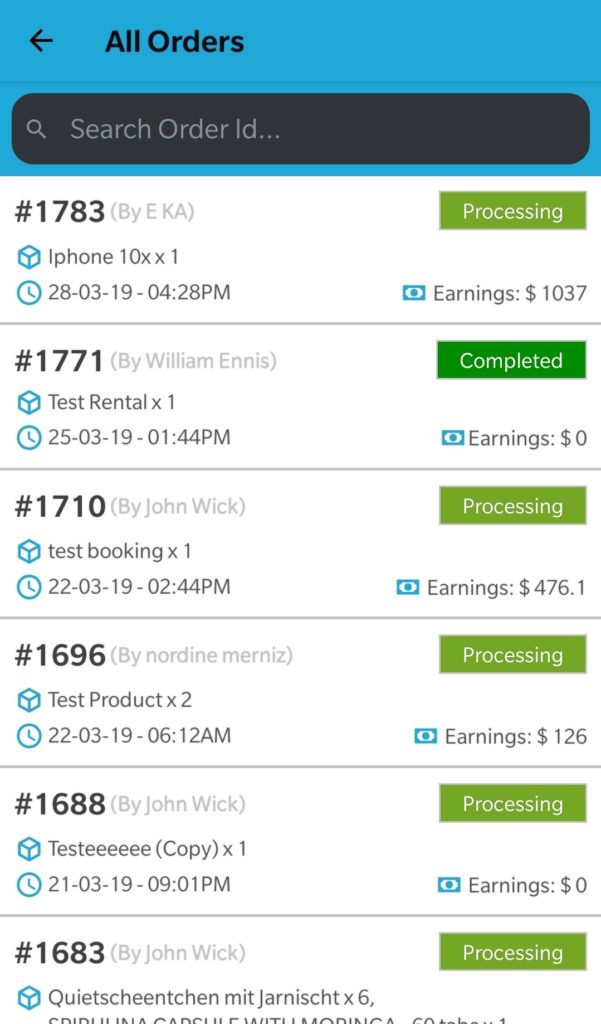
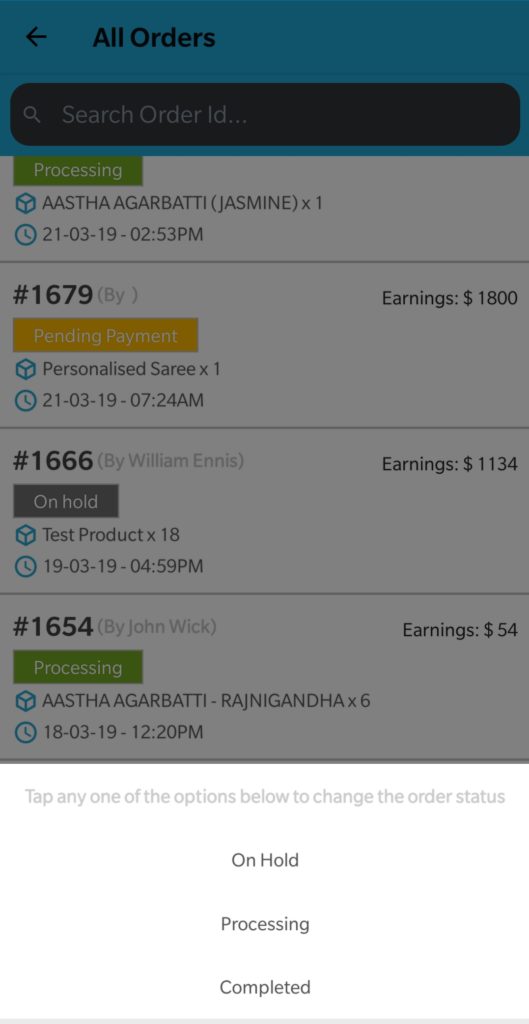
Vendors also are able to update their order’s status from here. Off course, capability should be “ON” at your WCFM capability setting.
5.3.Bookings #
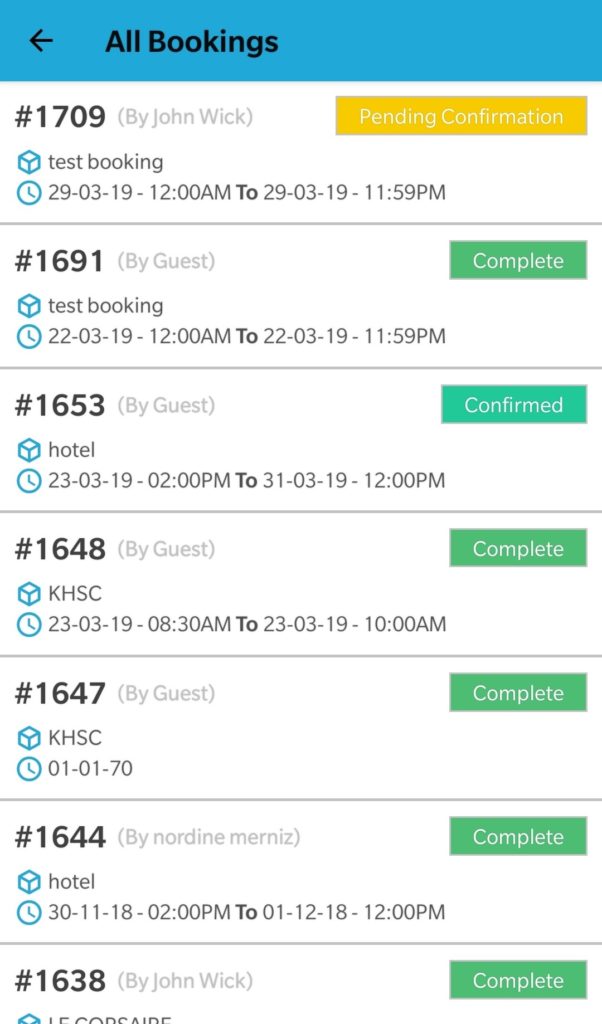
Well, if you are running a booking marketplace using WC Bookings plugin, then your vendors will have Booking section to check their product’s bookings.
5.4.Inquiry #
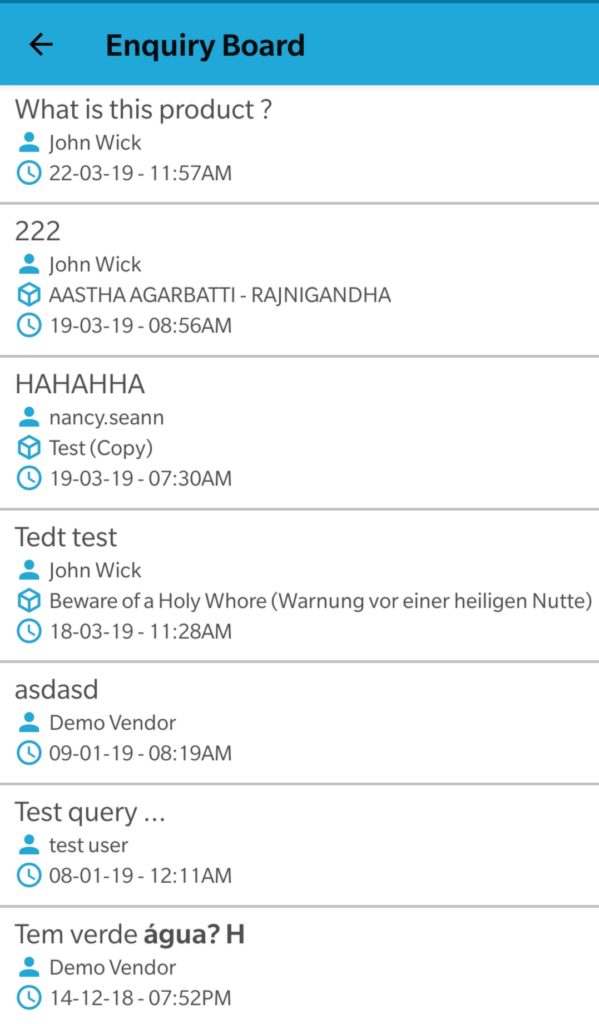
Enquiry section will show all enquiries for vendor’s products and his store.
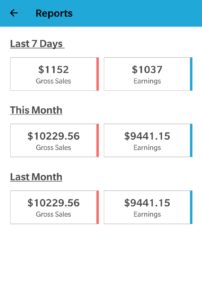
Vendors also check their sales overview report from sales report section –
- Current week sales stat
- Current month sales stat
- Previous month sales stat
6.APP Notification #
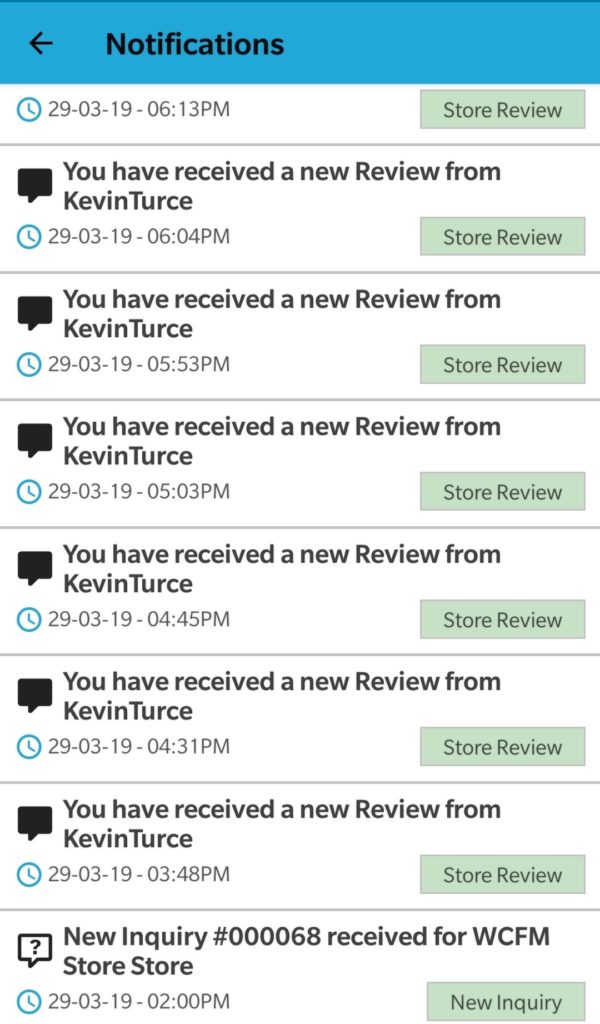
Notification is most important part of this. Vendors will receive all notifications to their phone as general Android notification.
They may also check notification details from Store Manager – Enquiry section
Delivery Person App
1.Overview #
Delivery is an essential part of e-commerce site especially when you are running business which involves physical or service products such as grocery items, electronic goods etc. Eventually, it becomes difficult to control this marketplace without a delivery person being assigned for this task.
Fortunately WCFM gives you full featured delivery management system for your store and even for your store vendors. For this, you will need to have WCFM Delivery addon. In this article we will discuss vividly about this explicit addon and it’s features.
[button color=”green” size=”medium” link=”https://prothemeworld.net/wcfm-woocommerce-frontend-manager-delivery/” icon=”” target=”true” nofollow=”true”]DOWNLOAD PLUGIN[/button]
2.Adding Delivery Person #
To start with, lets check how admin and vendors add delivery personal for their delivery.
By Admin: Once you add “Delivery person” addon you will get an option here : WCFM Admin Dashboard -> Delivery person -> Add New.
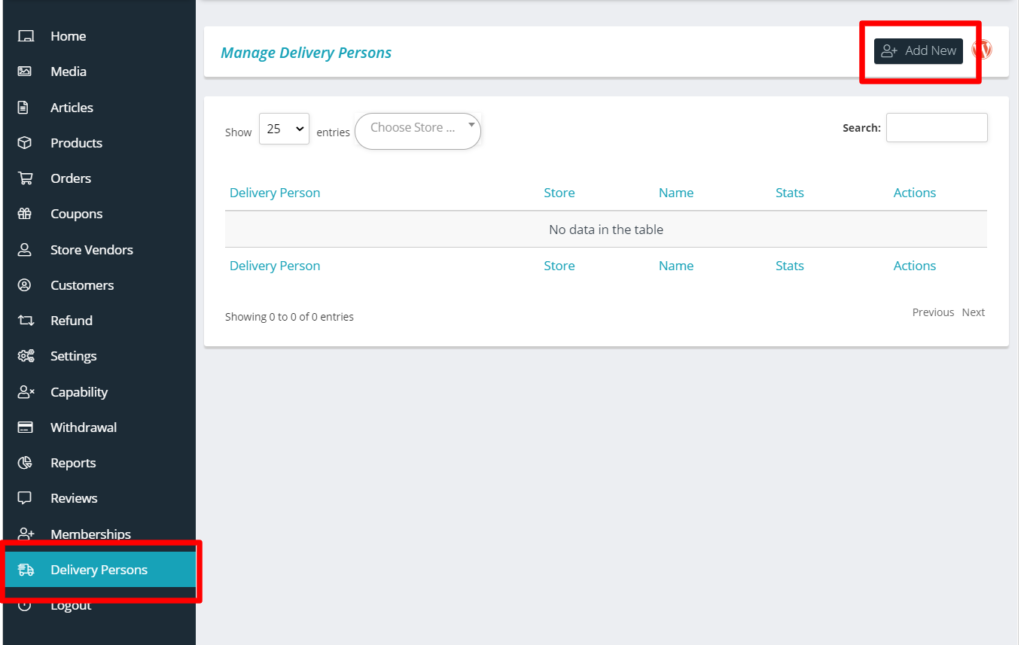
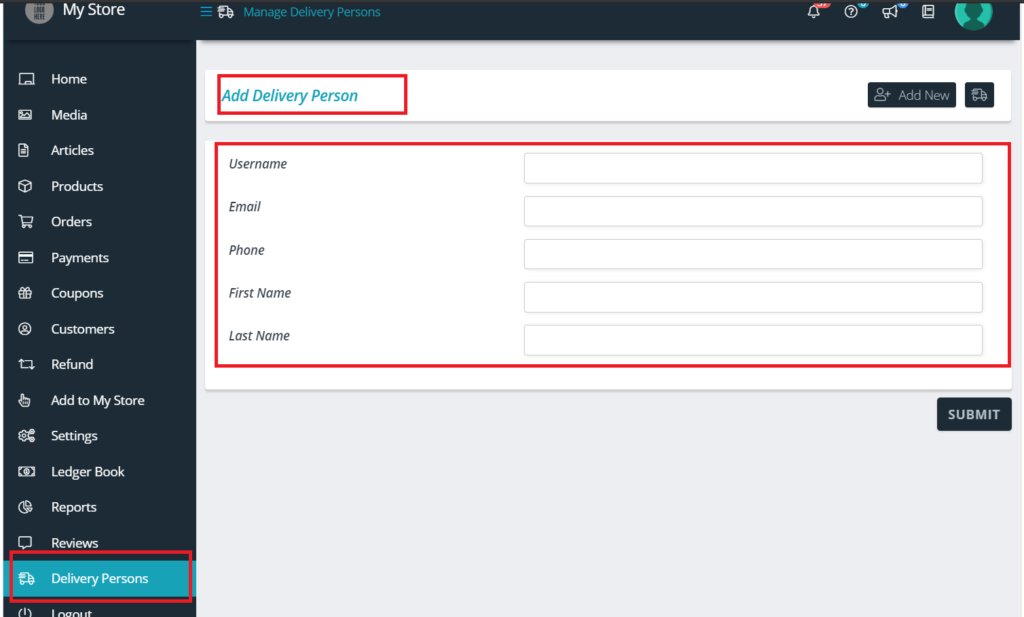
Clicking on “Add new” section will let the admin enter details such as Username, email etc. Following is the screenshot of the same:
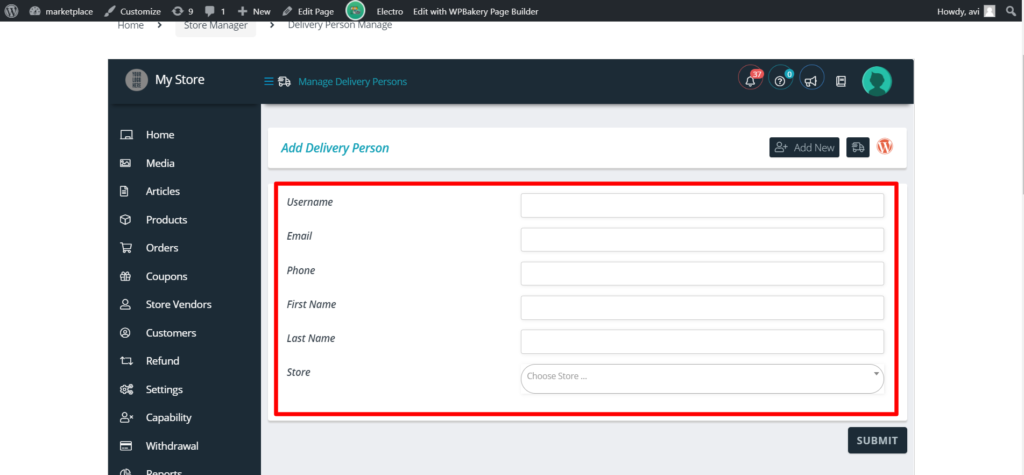
Admin can assign this delivery person to a vendor as shown from the store field:

Once this is added, this delivery staff will be reflected under Vendor Dashboard under “Delivery Person” settings: ( shown below)
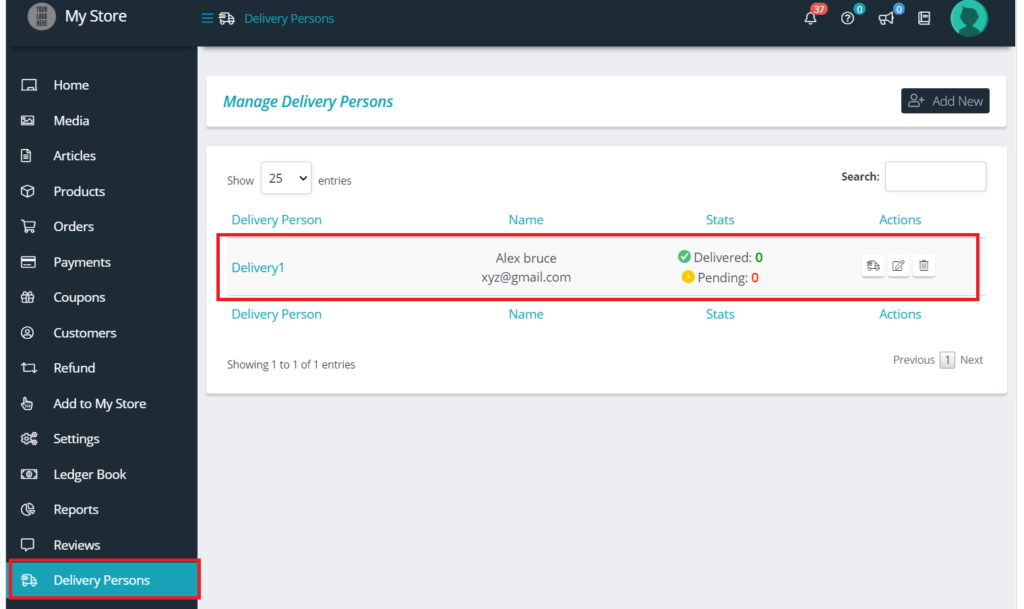
By Vendor: Similar to admin, vendors can also add delivery person for their store. For doing so, they will have to Goto WCFM Vendor Dashboard -> Delivery Persons -> Add New
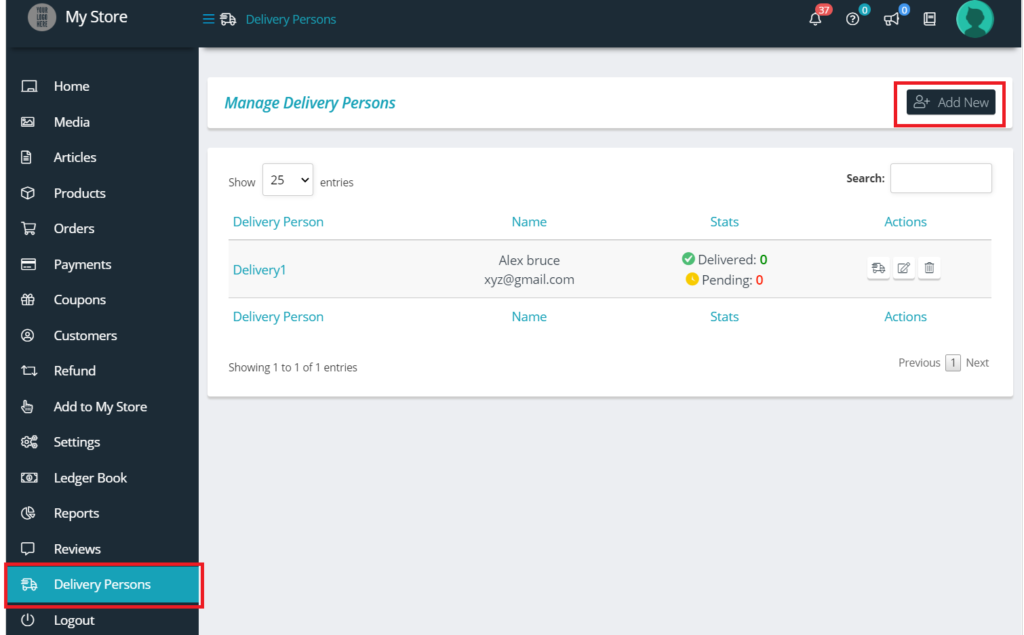
Unlike Admin, vendor will not find store option while adding delivery person because they are suppose to assign them for their own store, have a look here for better understanding.
3.Managing Delivery Person #
Admin and Vendor will have a list of delivery person/boys assigned and they can manage them efficiently from here. One can goto WCFM Vendor/Admin Dashboard -> Delivery Person. From here one can see list of delivery persons and can manage each of them. Here’s an example of Manage Delivery section from Admin Dashboard:
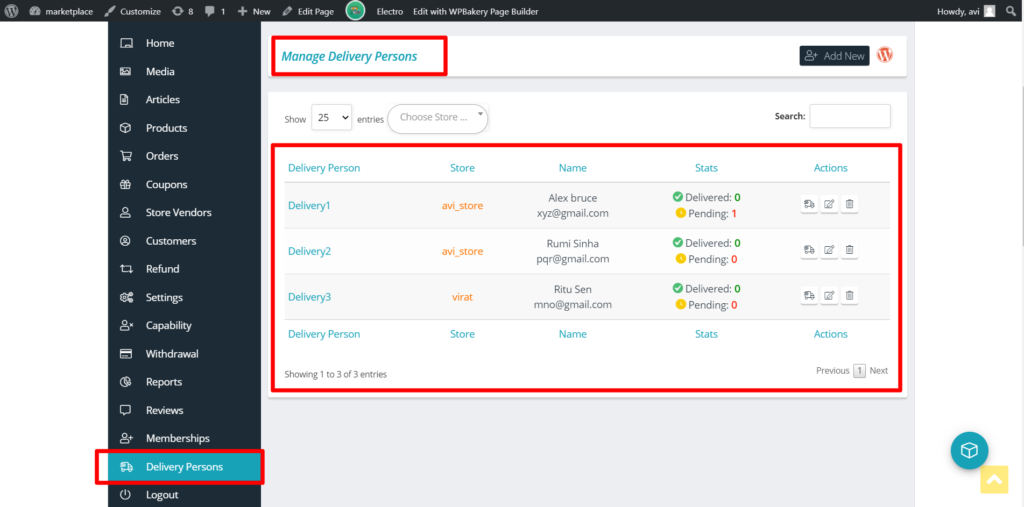
PS: Vendors will not see the “Store” column as shown above unlike the admin.
4.Assigning Delivery person. #
Admin or Vendors can assign delivery boys directly from WCFM Order Dashboard. You will find a delivery icon in each order like this shown below:
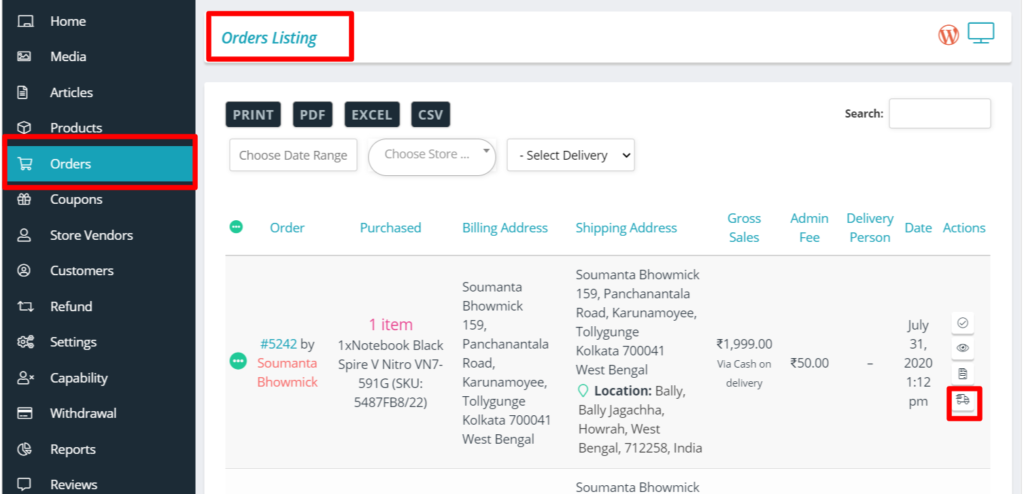
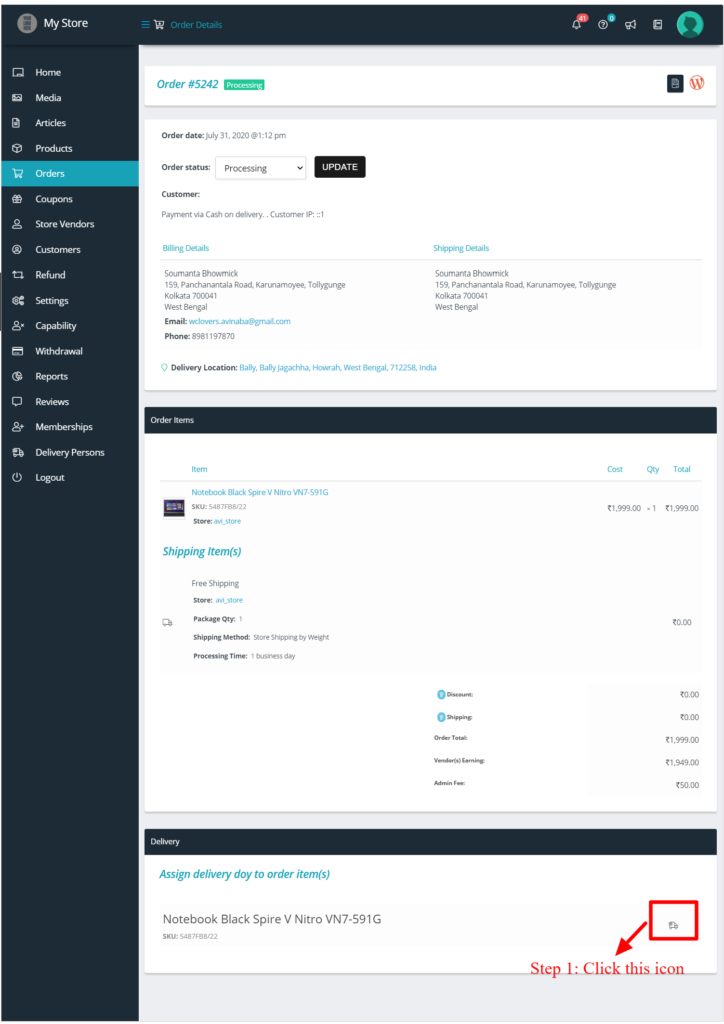
Once you click on “assign delivery boy” icon if you will be redirected to Order details page from where you can assign delivery person from the list.
If you are not using Ultimate plugin, then you will be able to add delivery person as shown below:
Pic 1: Showing order details page with “assign delivery person” icon
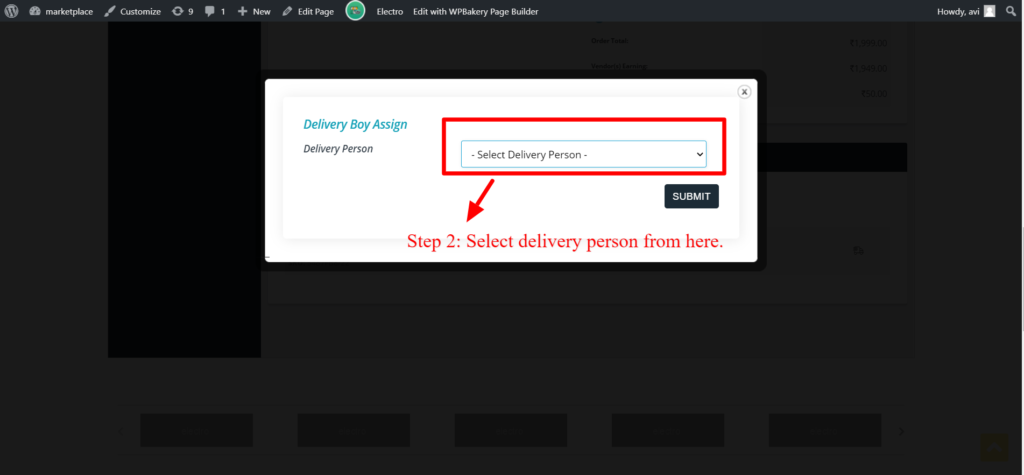
Pic 2: Assigning delivery person against an order from drop-down list.
Incase you are using Ultimate plugin, you will see the delivery icon under Shipment tracking section as shown below:
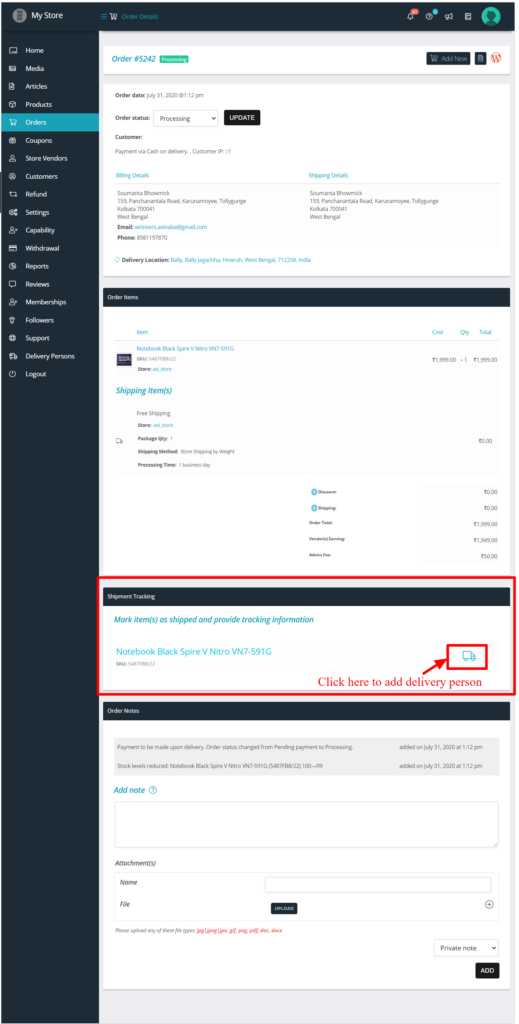
Clicking on the above icon will allow you to add delivery boy and relevant tracking code and url for the shipment as shown below:
![]()
5.Delivery Stats #
WCFM provides an interface where you can have check into the stats of delivery operations quickly. Admin and vendors will see a stats column in their manage delivery person page as shown below:
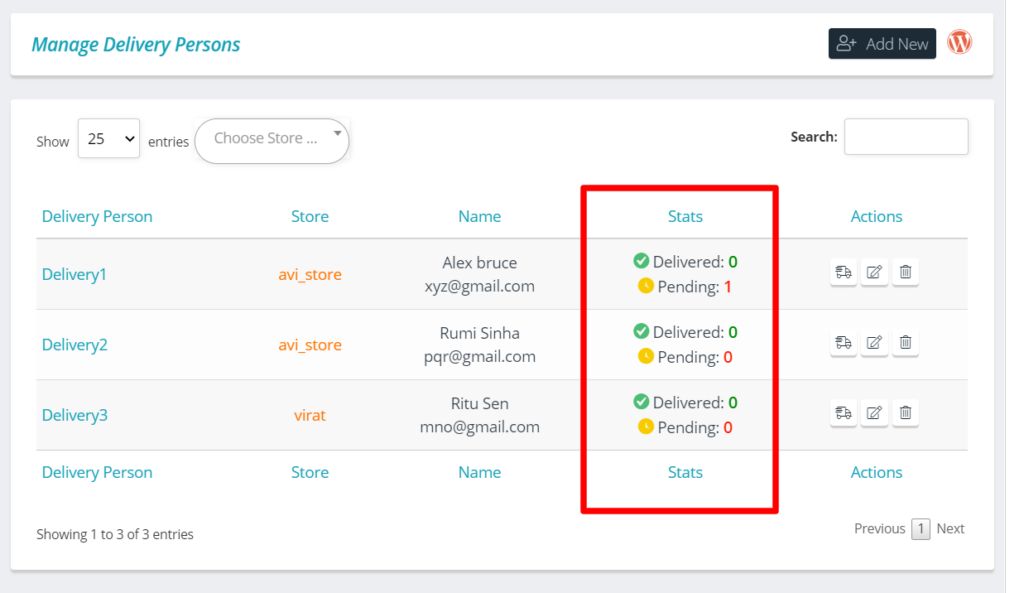
(Pic showing list from Admin Dashboard)
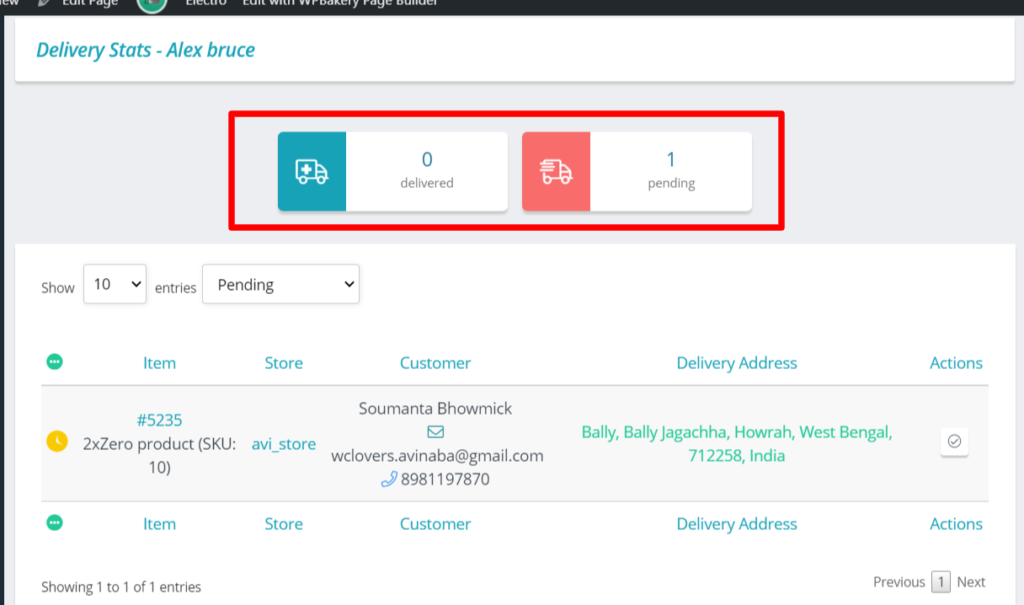
One can also see the stats of individual delivery person by clicking on the respective name as shown below:
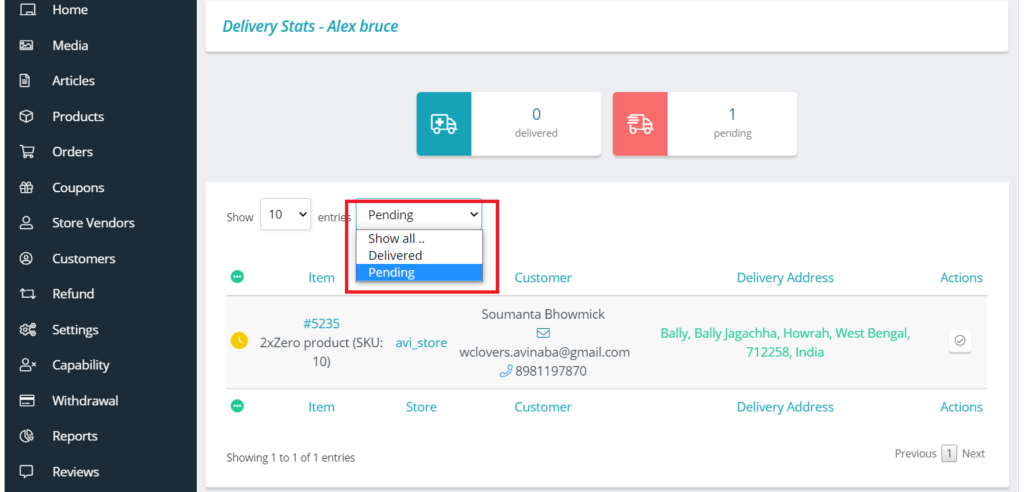
Additionally, one can also filter the stats by delivery status ( as shown below)
6.Delivery Person view #
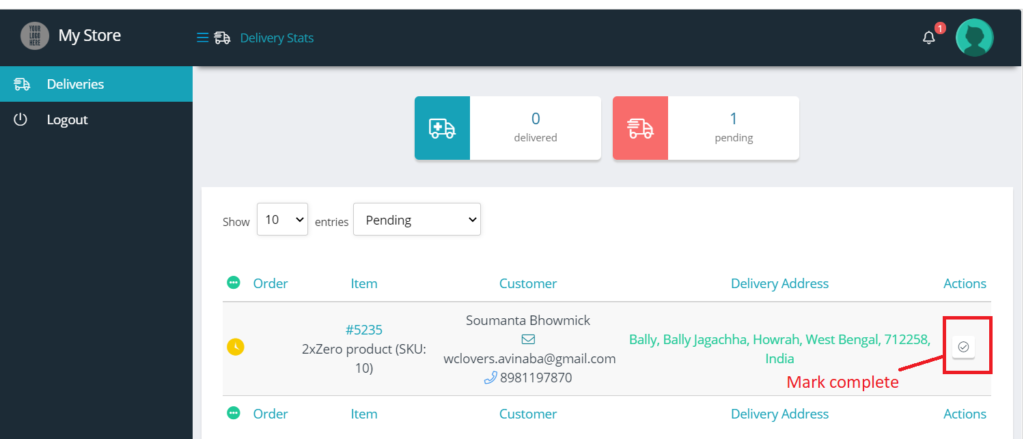
WCFM provides a login for Delivery Persons as well and they will be able to check their delivery list from this dashboard provided. They will be able to see delivery information such as customer details, order items and delivery address. Here’s a screen-grab of delivery person dashboard.
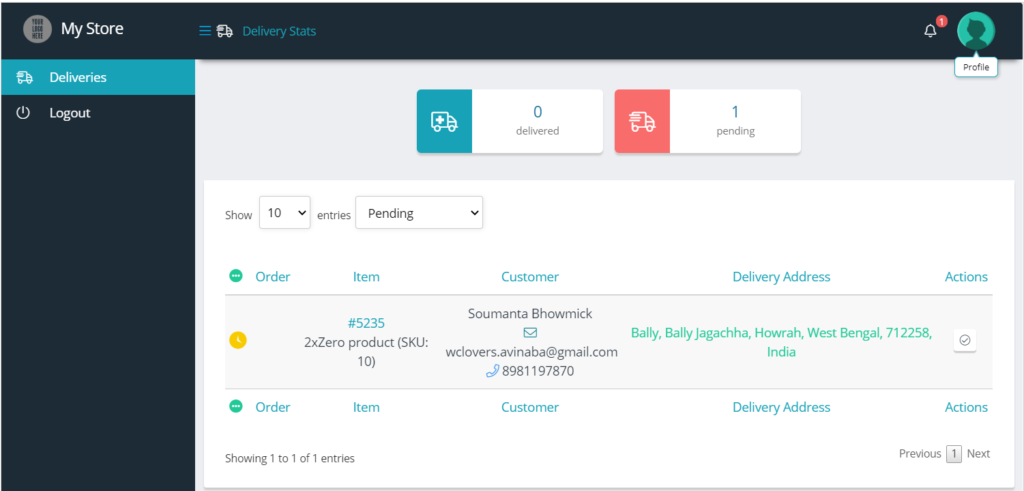
Upon successful delivery, the delivery person can mark the order as “delivered” from Actions column as shown below:
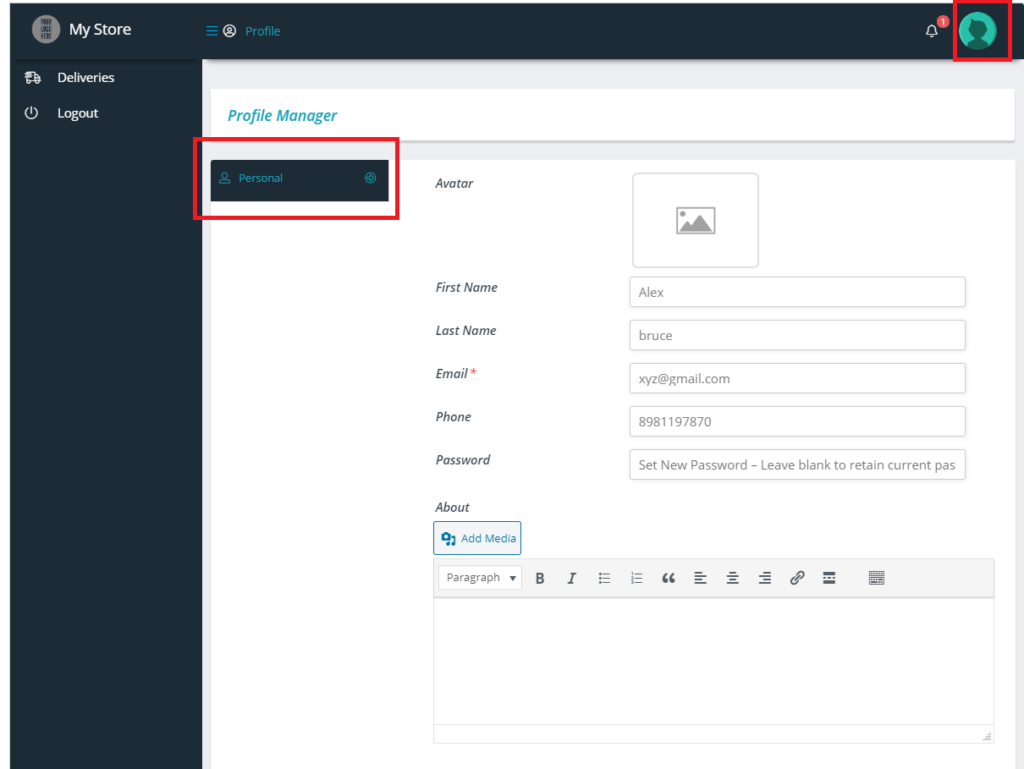
Additionally, delivery person can manage their profile from dashboard by clicking on Avatar as shown below.
7.Delivery Notification #
It’s important that the users get updated and notified regarding deliveries. Customers, admin and the delivery persons are notified in their respective dashboard about the same.
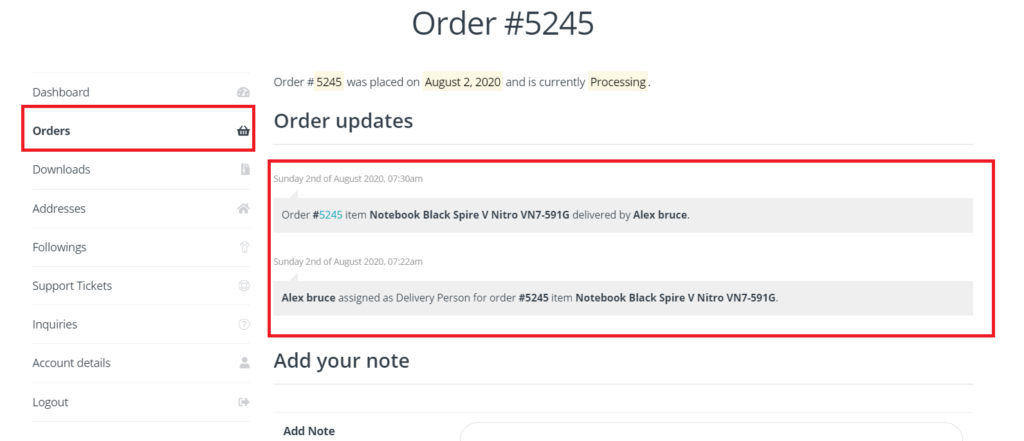
Customers will be able to see notification regarding deliveries in their profile under “order” tab. Here’s an example of the same:
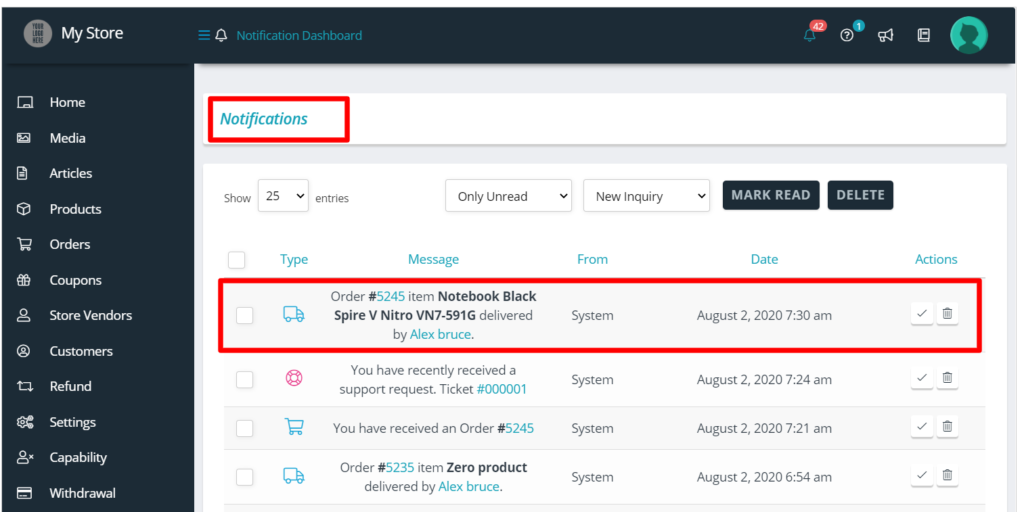
Admin and Vendors will get notified about all updates regarding deliveries in their respective dashboard under notification section. ( example of admin dashboard is shown below)
Correspondingly, the delivery boys will also find the assigned delivery tasks in their own dashboard as shown below:
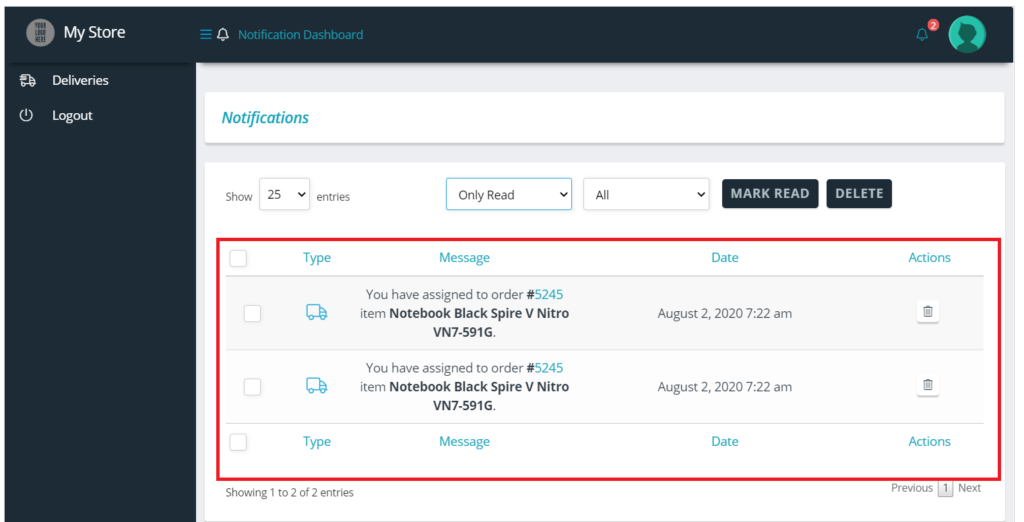
PS: For seeing the notification, one has to click on the bell icon beside the profile avatar.
8.Delivery Settings #
WCFM provides extensive settings which will let the owner of the site to control and manage this module easily.
To start with, admin can manage the notification settings of new account along with the delivery times from here: Goto Admin Dashboard -> Settings -> Delivery
They can set the notification mail, it’s subject and content as shown below:
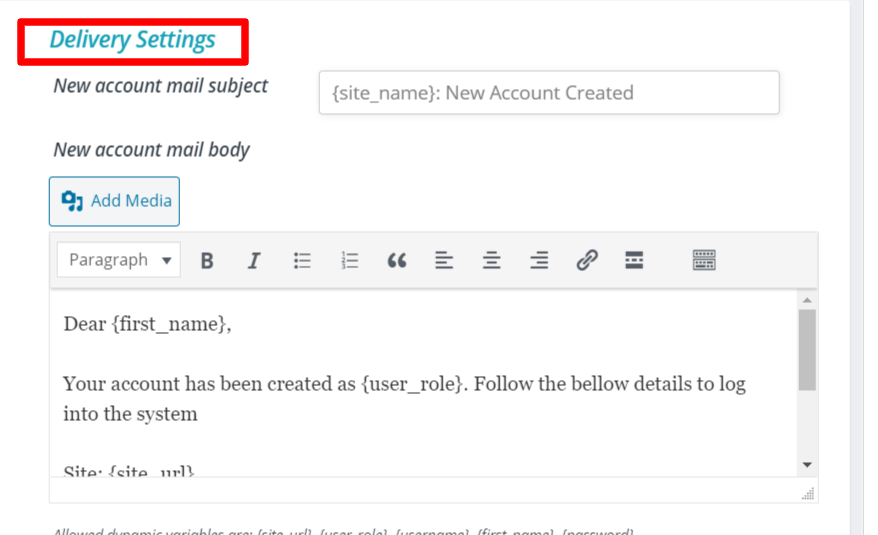
In addition to it, admin can also set the delivery time and delivery slot as shown below:
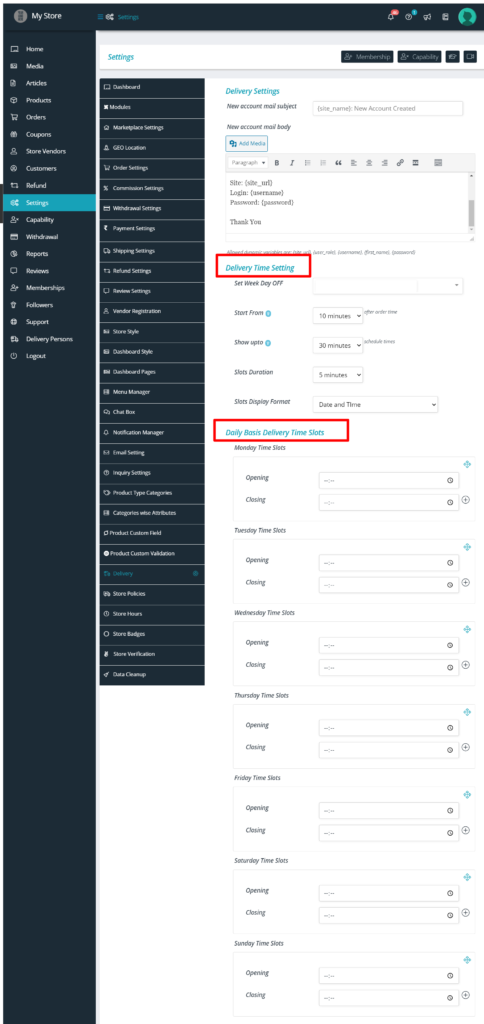
For details regarding the settings of time-slots for delivery refer to this documentation here.
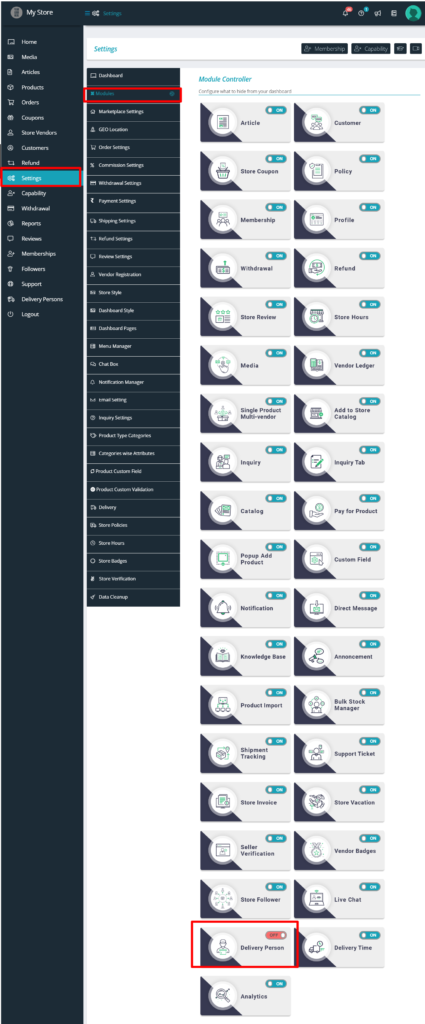
You can also TURN OFF the delivery section via Modules section, for this you will have to Goto WCFM Admin Dashboard -> Settings -> Modules and turn OFF the delivery module as shown below.
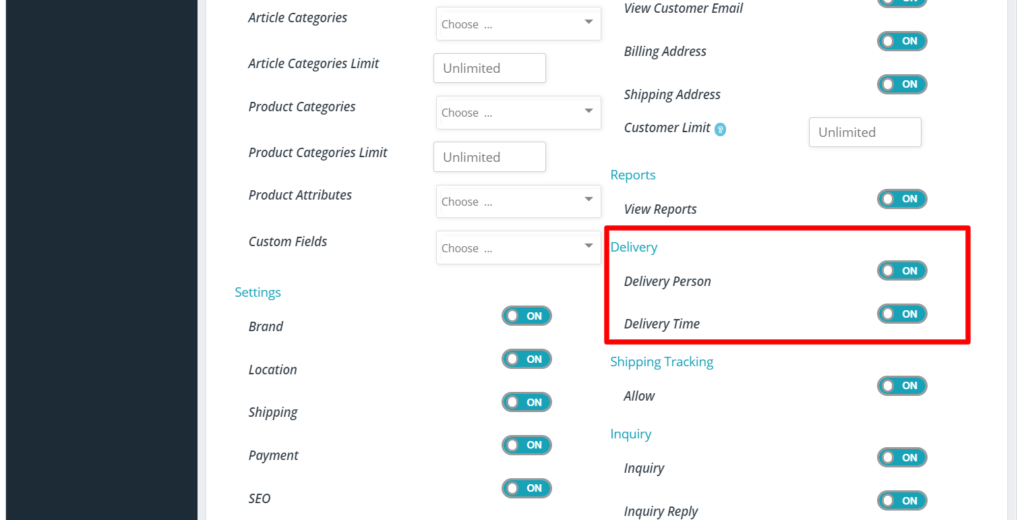
You may also disable “Delivery” for vendors using WCFM Capability settings, and here’s a screen-grab of the same:
